Honda CRF230F - Modifications
July 16, 2021 version
| Introduction | Modifications | Big Bore | DIY Notes | Carb Notes | A look back |
|
|
Honda CRF230F - Modifications
|
Click pictures to supersize.
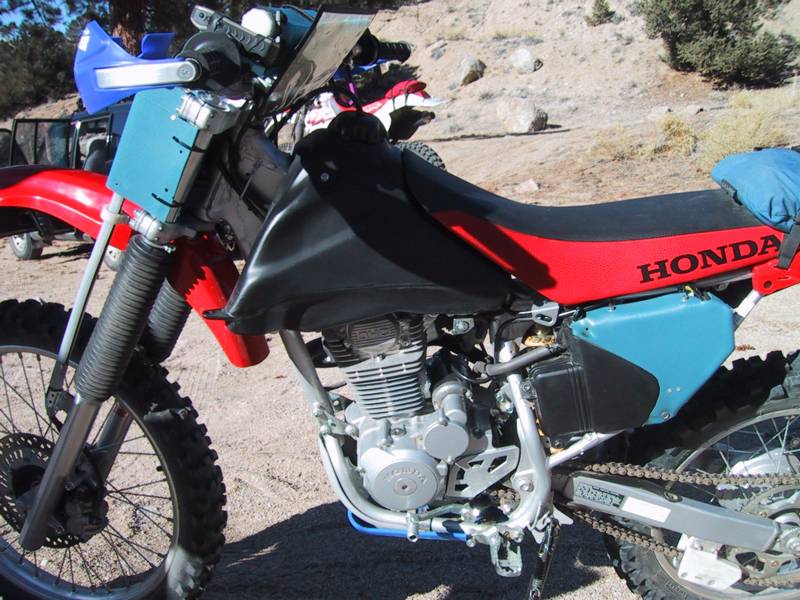
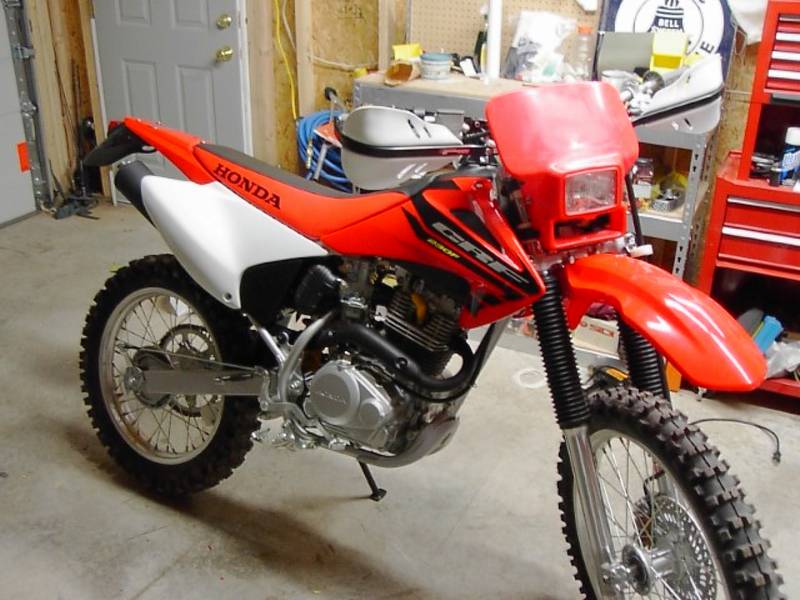
Alphabetical table of contentsWhat is going on here? I just bought the 230F, and already I'm modifying it. Well it's in my nature to change any new bike that I buy. I justify changes as 'personalization', but I suspect I'm just a closet engineer, and I want to 'design' my own changes to satisfy my engineering urges. I did the following in no particular order:
|
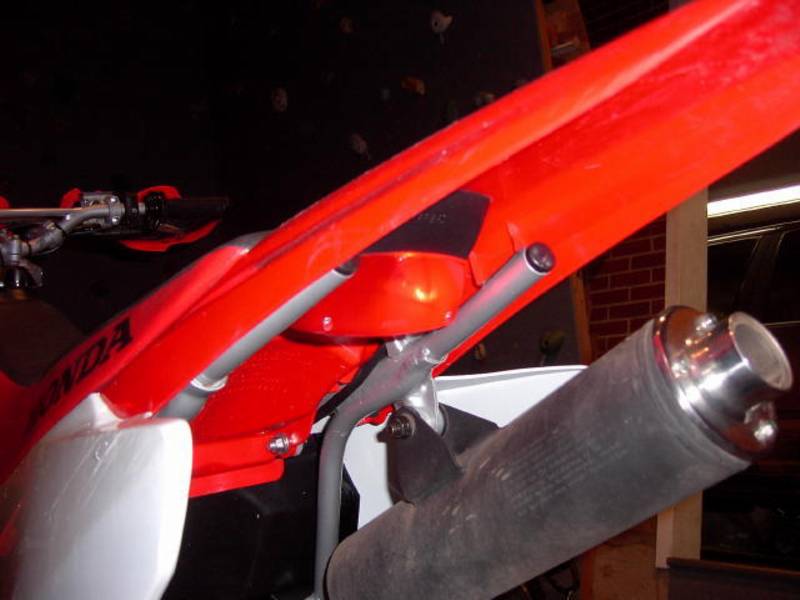
Removed the unnecessary exhaust pipe heat shield. I cut the two right-side number plate spacers off the muffler; I don't use the side number plates, and I needed to get that extra weight off ;-)
With the plastic side covers (number plates) removed, part of the battery compartment was exposed. I made a small unobtrusive plastic cover to secure the area. I also made a small box for the front that holds my lunch, extra gloves, etc. I made both of these out of Kydex plastic, which is easily cut and is heat deformable.
|
|
|
|
|
|
Shifter bolt - Replaced the shifter mounting bolt with a longer bolt, then added a lock nut. The shifter will never come loose!
New footpegs on new footpeg mounting brackets. <---------------- click this!
|
|
I also removed the air box intake
baffle. After doing these mods, I went up one on the main
jet, and the plug is nicely tan colored.
|
|
CRF150F, CRF230F, and CRF250X Diffusers
On the CRF150F, CRF230F, and CRF250X, the spark arrester and exhaust diffuser are sold as an assembly - 18355-xxx-yyy Arrester Assy.
CRF230F 2003 04 05 06 07 08 09 12 13 14 15 (no 10 and 11).
CRF150F 2003 04 05
CRF250X 2004 05 06 07
Later versions of the CRF250X assembly (08 and up) are sold as a welded unit - 18340-KSC-305 and A20. The diffusers from the 150F/230F and early 250X arrester assemblies are different lengths, have different end caps, and slightly different geometries, but they are interchangeable with no significant power side effects or sound level differences. Well, maybe a very slight increase in sound with the 250X diffuser... could be tester bias.
I have noticed that the 250X diffuser threaded hole is sometimes a smidgen misaligned with the spark arrester screw hole. Elongating the spark arrester hole about 1/64 on the correct side fixes the problem. The misalignment is caused by the 250X diffuser endplate being crimped slightly off from spec.
The diffusers are different lengths.
The 250X spark arrester has a different rear mounting plate, but the spark arrester screen tube is nearly identical to the 150F/230F version. The overall length of the two spark arresters is the same, although the internal screened segments and external tail piece extensions are different lengths.
Skewing of surfaces viewed from the side is due to the wide-angle lens on my camera.
Some CRF250X notes: The CRF250X 04-07 mufflers have the same part number: 18310-KSC-010 The 04-07 arrester assemblies have the same part number: 18355-KSC-A10 BUT, the parts fiche shown on Honda dealers web pages shows the parts that Honda sells NOW. When the bikes were released each year, the parts were often different. That is the case for the arrester assemblies. The 04-06 part numbers were 18355-KSC-000. The arrester assembly was changed in 07 (18355-KSC-A10) and again in 08. Note that you cannot buy the diffuser as a separate part from a Honda dealer. Also note that the arrester assemblies are very expensive - partsfish.com shows them at $244. BTW, Honda calls them arresters on the parts lists; others call them arresters and/or arrestors. My spelling correctors / correcters flag both as incorrect. WHA????
Buy the
Bikers Choice Exhaust Pipe Baffle 1-1/2" OD Steel 64301 492611 from Amazon for about $10.
Here are two more baffles I found on Amazon: I'm sure there are more.
Rebacker motorcycle 35mm exhaust pipe DB Killer Muffler Insert Baffle Silencer
FOLCONROAD Universal Motorcycle Muffler Insert Baffle Can Removable 35MM PS I only bought the parts and took pictures; haven't installed one in a running 230F yet, so I don't know how quiet they are. |
|
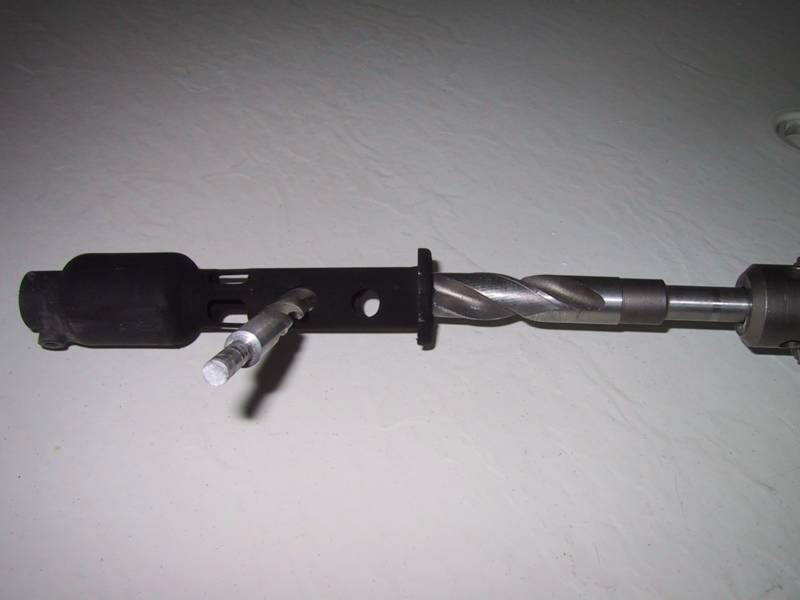
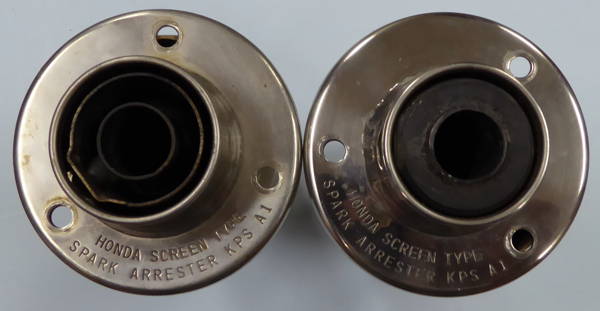
Muffler noise and spark arrester - How legal is my CRF230F?
So what does "KPS A1" mean? Off-Highway Vehicle spark arrestors - A description of Off-Highway Vehicle spark arrestors and how they relate to fire prevention. Includes inspection, maintenance, and guide. Spark Arrester Guide Index Page - shows links to the lists of approved spark arresters. Download the "Off-Highway Vehicles" document. See page 19, line 200.
|
|
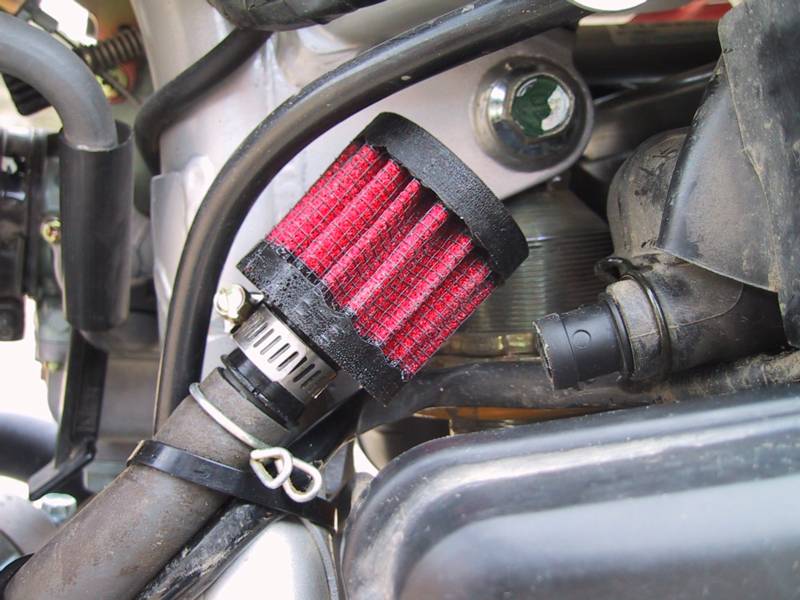
Decoupling the tranny from the engine intake is supposed to reduce pumping losses. The new Yammies do it by adding a bypass channel in the engine cases. |
|
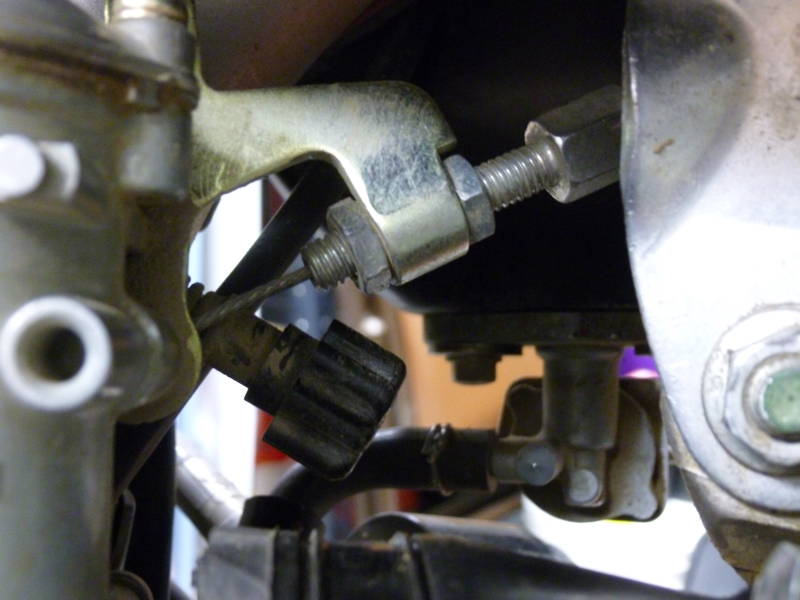
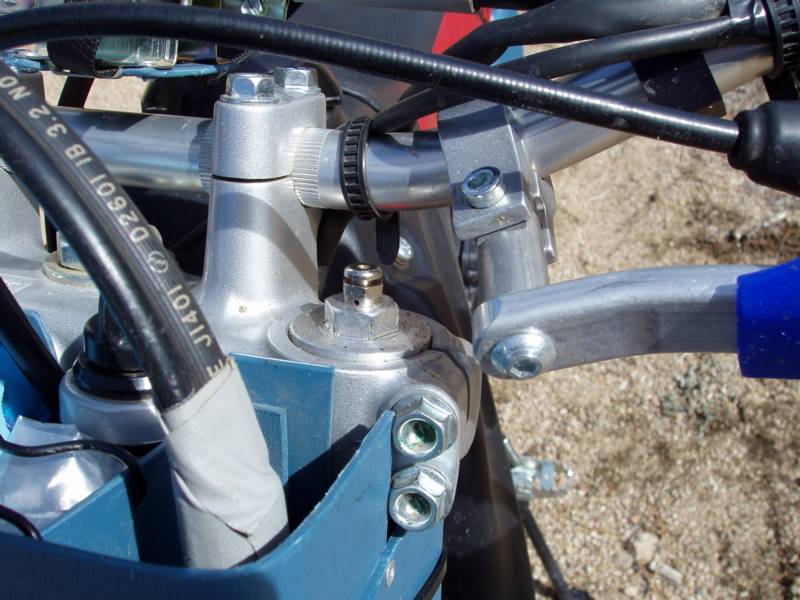
Remove excessive slack in the pull cable by adjusting the fitting on the carb throttle drum bracket. Back the end nut off to the end of the bolt, pull the cable to the right to take up slack, then screw the right nut towards the bracket. Finish by pushing the cable back to the left and tightening the lock nut. Use my spacing as a guide; YMMV. Fine tune the cable slack by adjusting at the throttle assembly on the handlebar.
|
|
Front sprocket - Changed the front sprocket from 13T to 12T. This change added back some performance zip that was lost because I ride at elevations over 7,000'. The change didn't affect top speed much. The 230F uses the same front sprocket as the 88-95 XR250R. I bought a Sprocket Specialists 568 sprocket, but other brands will work as well ($12.96 from Chaparral). The Service Manual says to place the flat side of the sprocket facing out (the stepped side toward the engine). The chain is continuous and does not have a master link. When you put the smaller front sprocket on, you'll have to loosen the rear axle to get some slack in the chain to swap the sprockets. Make sure you set the chain slack correctly when finishing up. |
|
|
|
|
 Left
Left
 Right
Right
 Side Side
|
|
$15 for a set of 2 bleeders. These bleeders are designed to replace stock fork bleed screws on forks which have them. Some forks do not have fork bleed screws. For these forks, riders have tapped their fork caps to accept these bleeders. Stock CRF230F forks do not have fork bleed screws and must be tapped. Advice from sawatch on ThumperTalk
I used the silver bleeders, 11-0095 M5x0.8 I use my lathe to drill the centered hole, from the inside, then tap. Be careful, I found that the newer caps are softer than older ones and will gall: run the tap in and out about 3 or more times so it won't load up. Use a 30 degree countersink to clean the top threads and create a very small bevel edge for the rubber o-ring seal. Don't flatten the o-ring too much. A bit of loc-tite is used to secure/seal the bleeder. I bleed my forks when compressed during hauling [helps keep the fork seals from leaking] and then when forks are fully extended bleed them to achieve ambient atmospheric pressure. Advice from ramz: So when and how to use them?
Before riding and during a ride if you feel the forks getting stiff as the air inside gets hot and expands: After loading your bike for the drive home. After tying down the front end, use a finger on either hand to bleed the air from both forks. You should hear a hiss. |
|
Tires - As I unloaded the bike for a ride in March, I noticed the front tire was flat. After removing the tire and tube, I discovered several holes and a tear on the side of the tube, as if pinched by the tire sidewall. The stock Pirelli MT320 tire has a very flexible and lightweight carcass. I replaced the tire and tube with an IRC VE-35 3.00-21 6-ply rated tire and an MSR Gold Medal heavy-duty tube. The front wheel seems to track better now, and it looks a lot sturdier than before. The MSR Gold Medal heavy-duty tube is not as heavy as the Metzeler or Moose heavy-duty tubes but is heavier than a normal IRC or Cheng Shin tube and the stock Pirelli tube. The MSR heavy-duty tubes are a good compromise if you're trying to keep wheel weight down and want reasonable pinch protection. As for the tire, I think the IRC VE-35 6-ply rated tire is the best front tire for trail riding (since the Dunlop K139). (I said trail riding, not racing!) |
|
I mounted a Cheng Shin C-755 4.10 -18 when the stock rear Pirelli wore out. The rear Pirelli wore better than the front Pirelli, but I didn't care for its flexible carcass any more than I did the front tire. I installed an MSR Gold Medal heavy-duty tube also. However, the 4.10 turned out to be much smaller than the stock 100/100 Pirelli, and I didn't like how it performed. I had hoped the 4.10 would be a low-profile wide tire, but it's not. So I mounted an IRC iX05H 100/100-18 (with the MSR tube). The iX05H is almost the same size as the stock Pirelli, and it works great. |
|
Note - in April 2006, I switched to trials tires for the 230F: Never going back to knobbies again! |
|
I had spare bolts and nuts, but the collar was another problem. On one of the CRF230F forums (ThumperTalk or CRFsOnly), someone found that the collars are not listed in the parts catalog for the 230F. Turns out, the collars are on the Rear Fender page (thanks Steve). Another rider offered the fact that the CRF450 uses the same collars and provided the Honda part number 83505-KM4-000. I ordered six of the collars (just in case I lose one again ;-). When I compared the 230F collar to the 450 collar, I noticed that the 450 collar is .05mm thicker. This is not enough to even notice during a casual visual inspection. The picture on the left shows the stock 230F collar on the left and the 450 collar on the right. Note the thicker flange on the 450 collar. What is curious is that the CRF230F and the CRF450 use the same collars, with the same part numbers. So why does my picture show they are different? Probably because the CRF230F collars were made in Brazil and the CRF450 collars I ordered came from Japan (says so on the label). 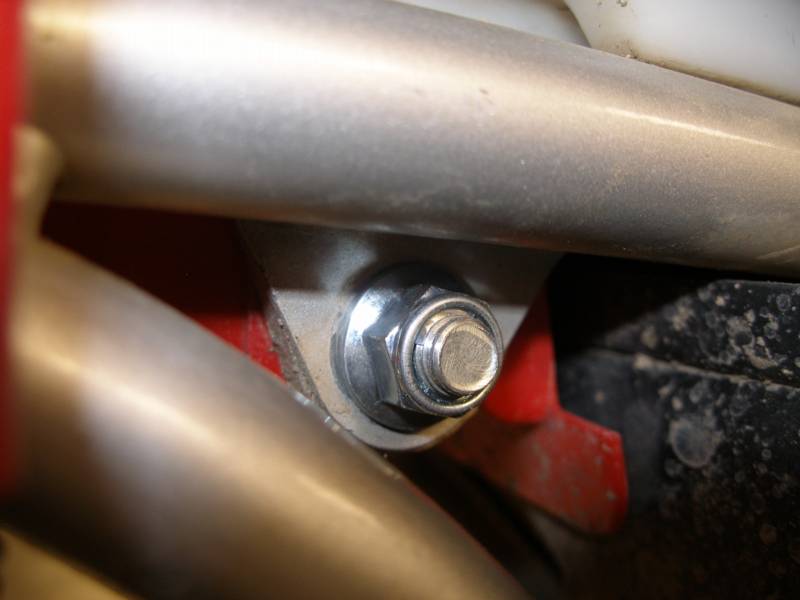
I also used locking flange nuts instead of the stock non-locking nuts. I bet they don't come off again (as long as I remember to tighten them!). |
|
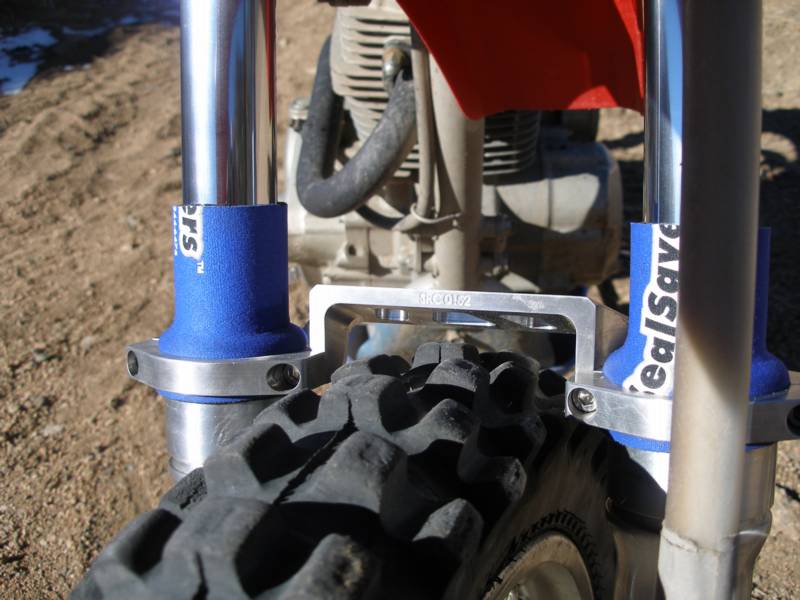
But, I discovered that the SealSavers were being torn up on the side that faces the tire. I think the front tire I use (IRC VE-35 3.00-21 6-ply rated) is a bit wider than most front tires. I like the wider tire, and rather than change to a narrower tire, I decided to add a plastic guard to the SealSavers.
I used some flexible blue plastic, cut about 1" high.
I cut two rows of guide holes and threaded two black zip-ties
through the holes. I've used this setup for about a month, and
it's working just fine. Note: I also shortened the SealSavers
because I did not need the extra length on the fork outers for
retention; the zip-ties do that fine.
|
|
I also did not use the SRC pattern for the fender cutout but
instead carefully cut only the absolute minimum necessary to
clear the fork brace, including the .125" clearance that
SRC recommends. I also added an SRC fender brace, which is the
black plastic piece above the fender. Both of these measures
insure that the fender will have adequate strength, even when
loaded with mud.
|
|
Other comments - 2004/2005 I ran out of things to do to the 230F so I bought a 250X and started over ;-) Note: I love the 250X, but I still ride the 230F on tight, technical scouting rides, and I still enjoy the 230F. I wanted to use the battery from the 250X on the 230F, but it turned out that my 250X has the exact same battery as my 230F; bummer. I wanted a light-weight, high-tech gel-cell to replace the stock battery. Sigh. I'll also check out swapping in the 150F right-side engine cover to get a manual kick start (as a backup for the magic button). Note: a rider who did this ended up using the CRF150 5-speed tranny gears and spent a bundle to get the kick start, so I won't bother doing this. A friend was working on 250 and 280 cc piston kits. The 280 piston caused cylinder instability, so it is out. My friend is not interested in a smaller displacement kit - "Riders want a BIG-bore kit, not a slight increase in size. We're not going to do any further work on the 230F." Note: see the Big Bore page for information on what I eventually ended up doing.
I will not be putting lights on the 230F; I don't ride at night.
The Jan 03 Dirt Bike issue says on page 67, "It has a lighting
coil, but no youth-sized XR/CRF comes standard with lights." The Service Manual shows: "Alternator - Capacity - 60W/5,000 rpm". The alternator wire goes to a regulator/rectifier box. The output then goes to the battery plus terminal. The battery is only used for starting. So if you tap into this circuit, you take amps from the battery charging circuit, which is probably ok. After starting, wait a bit before switching on your lights to let the charging system top up the battery. There is one other alternator output: from the alternator exciter coil to the ignition control module. Don't mess with this circuit! Pictures of the stator in the Service Manual show that two or three of the eight poles on the stator do not have any wiring on them. Ricky Stator will rewind the stator for more watts. I found these pictures posted by parkrider on a Yahoo group:
NOTE: the only minor problem I've encountered with the 230F is a tendency for the wheel spokes to loosen when I ride the bike hard. I check and tighten the spokes about once a month now. This is not a problem, just a maintenance item. |
|
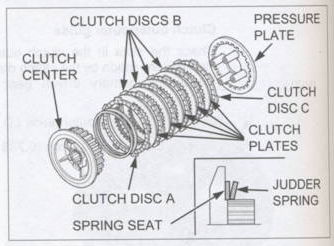
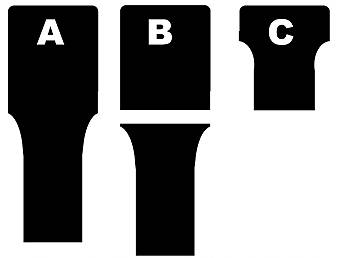
Clutch Friction Discs - This is not really a mod; more for repair information. Note - The Honda Parts Catalog calls them disks; the Honda Service Manual calls them discs, which is what I use here. There are three kinds of friction discs in the clutch and they can be difficult to tell apart. They must be installed in the clutch assembly in the correct order. The friction discs are:
22201-KAZ-000 - only 1, disc A in the Service Manual Here is how to tell them apart.
Of the remaining 5 discs, 1 has more friction pads (either side) than the others. Set it aside on a piece of paper labeled C. The remaining 4 discs should look identical in width and thickness and have the same number of pads on both sides and each other. Set them aside on a piece of paper labeled B. Note - each B and C disc has one colored tab when new. If the color has not worn off from use, you can separate B and C discs by tab color. The color is on the outside edge.
Here are some of the parts being discussed. Assemble the parts according to the Service Manual. When you slide the clutch center (plus judders, disks, pressure plate) into the clutch outer, wiggle the friction discs so the tabs align with the clutch outer slots.
Some riders soak the friction discs before assembly; I don't. I just coat both sides of all discs with engine oil, like the manual says. I also lightly coat the mating surfaces of the metal clutch parts with the same oil. When everything is assembled, I wipe off any excess oil. |
|
Clutch nut / oil pump nut The clutch nut is similar to the oil pump nut; they are sometimes installed in the wrong location... which will prevent proper operation of the engine.
The clutch nut, known by the Honda part name NUT, LOCK (16MM) and part number 90231-KB5-720 is located on the Clutch Center (see picture in previous panel) and holds all the clutch plates and other parts together. Assembly: apply engine oil to the threads and seating surface. Stake. 93 N·m (9.5 kgf·m, 69 lbf·ft) The oil pump nut, known by the Honda part name NUT, LOCK (16MM) and part number 90231-KPS-900 is located in the oil pump assembly, and holds the oil filter rotor in place. Assembly: apply engine oil to the threads and seating surface of the nut and install it with the chamfered side facing in. 83 N·m (8.5 kgf·m, 61 lbf·ft) Both nuts are removed and replaced with the same tool: special tool 07716-0020100, KS 9B 20x24, which you can order from some Honda dealers and also Motion Pro (# 08-0015). The 24mm end fits both nuts. A 1/2 inch drive short extension fits inside and a 1/2 inch drive ratchet makes easy work of removal and installation.
|
|
Shifting problems - This is not really a mod; more for repair information. Over the years, some riders have encountered shifting problems. It appears as though several parts can wear beyond tolerances and cause the tranny to exhibit shifting problems. Also, falling in a manner to exert force on the foot shifter can damage internal parts and cause shifting problems. The fix is to replace one or more parts in the gearshift drum area, behind the right side crankcase cover.
CAM, GEARSHIFT #6 24411-KPS-900 $15.63
SPINDLE, GEARSHIFT #9 24610-KT0-000 $32.48
PLATE, GEARSHIFT #10 24621-446-650 $7.45 GASKET, R. COVER (not shown) 11393-KGA-900 $9.36 Prices from DiscountHonda.com I have never replaced any of these parts, so I am personally unfamiliar with the procedure. I have read that it is fairly easy to do, essentially removing the right side crankcase cover, replacing the parts in question, then, using a new gasket, reinstalling the right side crankcase cover. The Honda service manual calls for removing the clutch assembly!! but some reports indicate that this is not necessary. YMMV |
|
I ordered the complete kit by calling Reger Engineering directly. The kit includes
every part necessary to mount the new forks AND ALSO brand new
Honda CR85R Expert forks. I also ordered a set of .40 springs
to handle my weight.
The second box arrived a few days later, and it contained
the brand new Honda forks. I quickly replaced the stock springs
with the .40s and slipped the forks into place. I bolted on the
brake adapter, the brake caliper, and the fork protectors. I
replaced the brake cable and bled the brakes. I installed the
front wheel and axle. Lastly, I installed my small blue box that
holds my extra gloves, lunch, and hand saw.
If you want a trouble-free experience, go for the whole Reger Engineering fork kit. But if you want to save some money, you can just buy the parts you want from Reger Engineering and scrounge the other parts elsewhere. Every part in the kit is available separately, so you have a wide variety of choices.
Bottom line - for best results, get the whole kit!
PS my next project is to bolt on the Works Performance rear shock! |
|
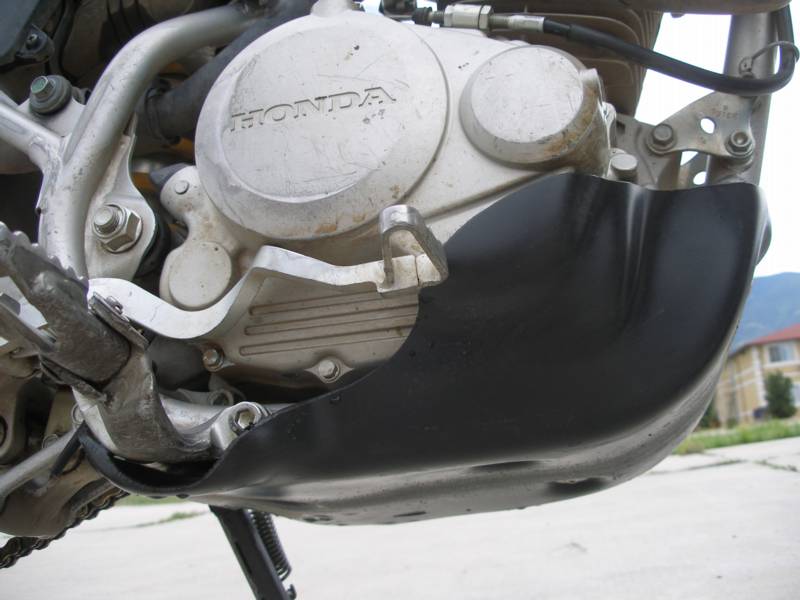
The Hyde units are made of Teflon/Co-Polymer, which they say is a form of polyethylene. They're supposed to be plenty tough, so I had high hopes. Hyde makes skidplates for the CRF230F and CRF250X, as well as other makes and models. What luck! I'd be able to test one on the 230F before committing to one for the 250X. The E-Line carbon fiber skidplate that I've been using for the last two years on the 250X has gotten quite a few nicks and pieces gouged from the bottom, and I decided it was time for a new one for the 250X also. Mounting the 230F model was a little difficult. The sides
at the back end wrap around the foot peg mounts, and the fit
is so tight that the skidplate does not fit flush with the frame
under the engine unless you hold it tightly in place. Then, the
front and middle mounting bolts don't line up with the frame
nuts. I had to elongate the front hole about 1/16" toward
the top front and the middle holes about 1/16" toward the
back. I left the bracket hole unchanged. With these elongations,
the mounting bolts went in with just a little coaxing.
The rear bracket snugged up with just a little help guiding it with a long screwdriver under the engine and above the frame tubes.
How does it work? Excellent. The Hyde is a much better skidplate
than the feed-pail unit I had installed previously. It wraps
around the frame and lower engine and provides a nice amount
of protection. The few rocks I've slid over and banged into haven't
done any noticeable damage. In fact, the bike seems to slide
over rocks easier than before. Not that I ride that much in the
rocks.
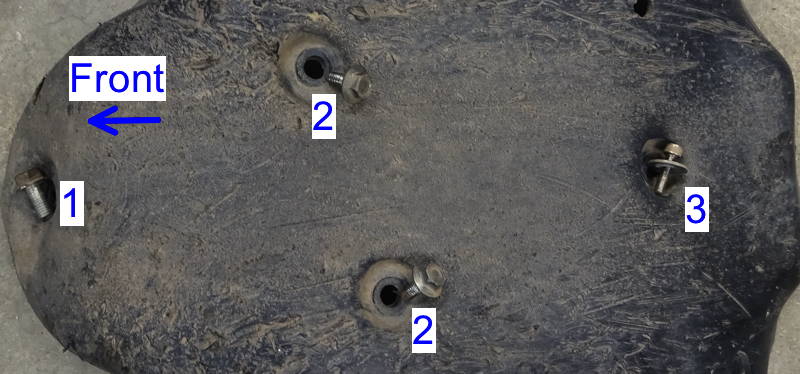
Hyde Skidplate (June 2018) - I removed the skidplate to check the mounting hardware. After 12 years, I found some well-worn hardware and a beaten but not bowed skid plate.
Bolt number 2 (two of 'em) go in the upper/forward frame tabs. Bolt number 3 goes in the bracket, which must be wedged into place so it doesn't move as you screw in bolt number 3. It takes a few tries to get the bolt started and then tightened up.
I use loc-tite on all the bolts, and contrary to what I said earlier about removing the skidplate to change the oil, I got lazy after a few oil changes, and reverted to leaving the skid place in place. After the oil drains out, I wipe the skid plate clean.
|
|
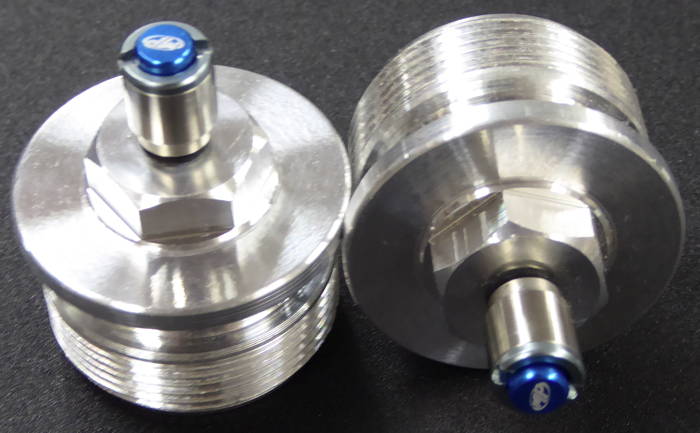
I had heard of John Hlebo in San Jose, CA and the rebuild and custom revalve that he does on CRF230F shocks. After a chat with him, I shipped my shock to him along with a letter describing where and how I ride, my weight, and what suspension mods I'd done to my 230F. About two weeks later, the reworked shock was returned. The picture shows the Hlebo-modified shock on the left and a stock shock on the right. Externally I saw the schrader valve at the top and a new rubber bumper on the shock shaft - not much to look at. A brief sidebar: Earlier this summer, I bought a second CRF230F - a cherry 2005 model. I modified the newer 230F the same as my older '03 moto, adding full dual-sport mods (lights, horn, mirror) and using a CRF150R front fork instead of the CR85R that I installed on my older '03. I heard that the 150R forks had better valving and were designed for the heavier 150R compared to the CR85R forks. This would suit the heavier 230F just fine. I bought a complete 150R forks/triple clamp front end on eBay. I called Reger Engineering and they said they would remove, modify, and re-press the 150R fork stem so it would fit the 230F. The modification consists of milling, lathe and machine work to the stem and bearing and reassembly of all components - cost is $60. I would also be able to use the stock 150R upper clamps with no mods. Note - the 150R upper clamp has no ignition key mount, so I removed the key/switch entirely. The dual sport electrical mods that I added (lights, horn) are switched on and off with a handlebar switch. I shipped the lower clamp and stem to Reger and soon it was back, ready for mounting on my bike. I tapped the fork brake mount and installed heli-coils in order to accept the Reger Engineering brake adapter. Reger charges $60 plus shipping to do this mod, but you may want to do it yourself (as I did). I bought some .40 springs and installed them in the forks, replacing the lighter 150R springs. I removed the stock 230F front end, installed the modified 150R triple clamps and the Reger aluminum steering stop, and slid the 150R forks in. (I can't remember which upper stem bearings I used, but when I remember, I'll add that info; I'm pretty sure it was the 150R bearings. The lower bearing is attached to the 150R lower triple clamp assembly.) I mounted the Reger brake adapter and the brake calipers. I mounted the 150R fork guards and the 150R front fender. I also added a CRF250X headlight using two home-made mounting brackets at the top sides and a zip-tie at the bottom. Everything fit great. Bonus! the 150R forks use a larger axle than the CR85R; it's the same diameter as the 230F axle. No wheel spacer mod is required - money and effort saved. I slid the stock 230F wheel in and the 150R axle and nut and tightened everything down. See axle notes in the next panel below. I installed the Hlebo-modified shock, set the preload, then went for a ride. I was very surprised; the shock worked as it never had before. I shoulda' done this mod years ago. Combined with the CRF150R forks, my 230F was very smooth on the trails, soaking up the bigger hits and floating over the smaller rocks and roots. I think the 150R forks feel a bit more solid than the CR85R forks on my other 230F, but that could just be wishful thinking. In the end, it's cheaper to go with the 150R forks than the CR85R forks. I wouldn't have believed that the stock Honda shock, with no external adjusters for compression and rebound, could be revalved and set up so well for me and my riding style. It's a tribute to John Hlebo's skill and I am very pleased with his work. This mod is so economical compared to buying a new shock that I would consider it a mandatory mod of the first rank. Even more important than changing the forks.
I plan to have my older '03 shock modified by John Hlebo also.
John Hlebo
Reger Engineering does the lower triple clamp mod and the heli-coil mod. I advise you to call Reger to arrange timely work; they sometimes shut down to go racing and don't do much work then. You may also want to buy a few parts like the brake adapter, steering stop, and others, as needed; see their web site. Get the heli-coils from your local hardware store. |
|
Forks (September 2016) - I have started a new web page: CRF230F Forks - Replacement and Modification I have included most of my fork-mod info into this one web page and have deleted that info from this CRF230F mods page. The new page is a work-in-progress because I'm still hunting down all the fork mod info I can find on ThumperTalk and ADVrider. The motivation for this change was to collect all the fork-mod info into one spot and make it easier for riders to do the mod themselves. Another factor is the apparent shut-down of Reger Engineering, who supplied some critical parts necessary to perform the conversion. I have sourced some of these parts from a local machinist and I anticipate that he will make no more than a handful of these parts. See CRF230F parts for further information. |
|
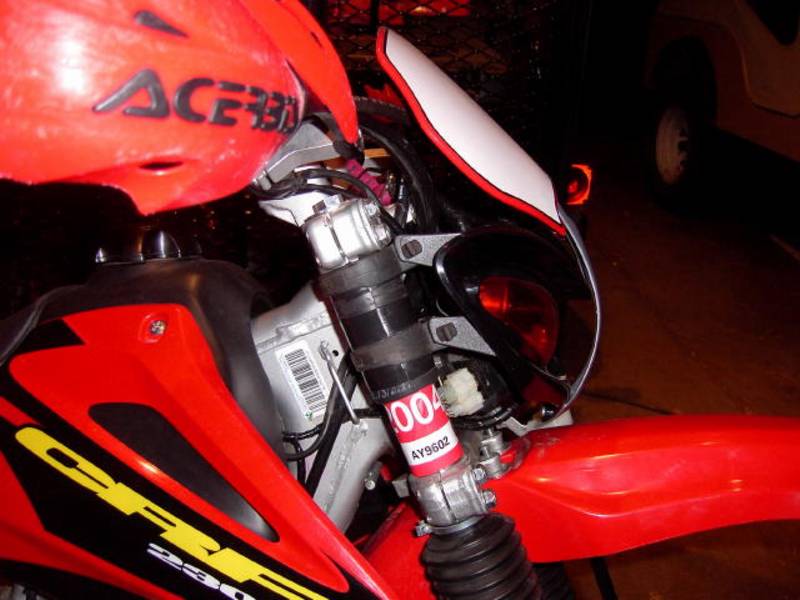
Fox PodiumX shock mod (March 2013) - I rode my CRF230F with the Hlebo-modified shock for two years and although it worked fine, I decided I needed an upgrade. In a previous panel, I mentioned that I had been looking at the Fox shock but by the time I decided I wanted one, Fox stopped making them for the CRF230F. Well, the Fox PodiumX came up in discussion on TT over the winter, and I decided I needed to look into this again. I called Fox and discovered that the PodiumX for the CRF230F was indeed available again. The heavy spring would barely be adequate for my weight, a bit under 200 lbs. But Fox wouldn't sell to me; I had to call one of their distributers. I called PR2 and they verified the shock was available. They took my info and ordered the shock from Fox.
When the Fox shock arrived, I quickly unpacked it and had a look. I was really impressed by the quality. The small instruction booklet and 2-page insert described how to adjust the clickers and other info. There was a sheet of paper included showing how to install the shock on the CRF230F/CRF150F. I removed the Hlebo-modified stock shock - unbolt the bottom link, unbolt the lower shock mount, raise the wheel/swingarm, remove top shock bolt, and remove the shock from the bottom.
I removed one bolt from the front of the airbox so it could be pulled back slightly to allow the remote reservoir to pass through to the left side of the frame tube. I removed the left rear engine mount and placed the reservoir mounting bracket into position (but not mounting it), then ran the Fox shock up from the bottom of the bike, passing the reservoir up first as I pushed the shock into position. I had to pull the airbox slightly away from the frame to pass the reservoir through. I installed the upper shock bolt. I slid the reservoir into its bracket, and fiddled with the battery/starter wires and bracket to finally decide to put the wires inboard of the bracket to keep them out of the way. I bolted the bracket into place, slid the reservoir into place, and tightened the locking bolt to keep the reservoir in place. I made sure to leave enough room to turn the petcock on and off - it's a close fit here. I installed the airbox bolt, the lower shock bolt, and then the lower link bolt. Pardon the dirty bike - I was in too much of a hurry to wash it.
I have two CRF230Fs, and when I got home, I called PR2 and ordered a second Fox PodiumX shock for the second 230F. Melanie and Chris at PR2 were very helpful getting the shock info, ordering, and shipping the shock to me. Chris happily took my order for the second shock. And I am a happy customer.
PR2 for Fox PodiumX shock - about $600 PR2 |
|
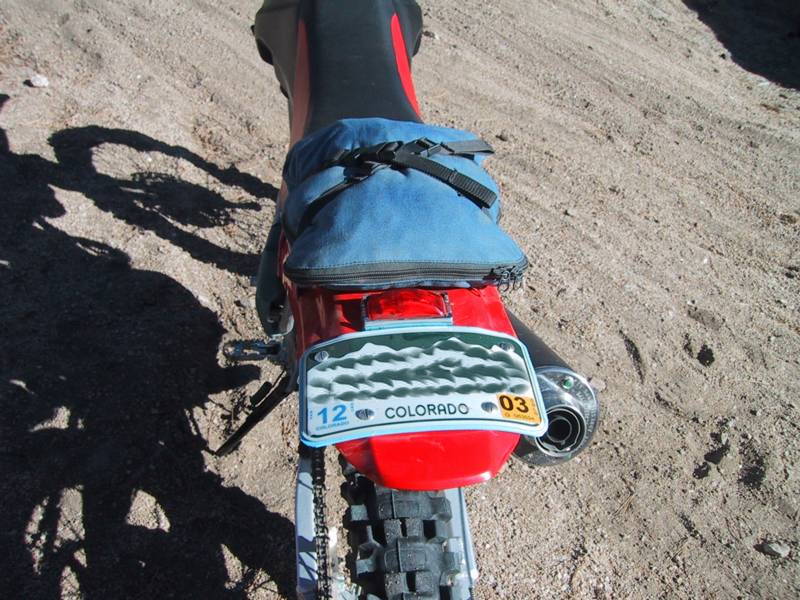
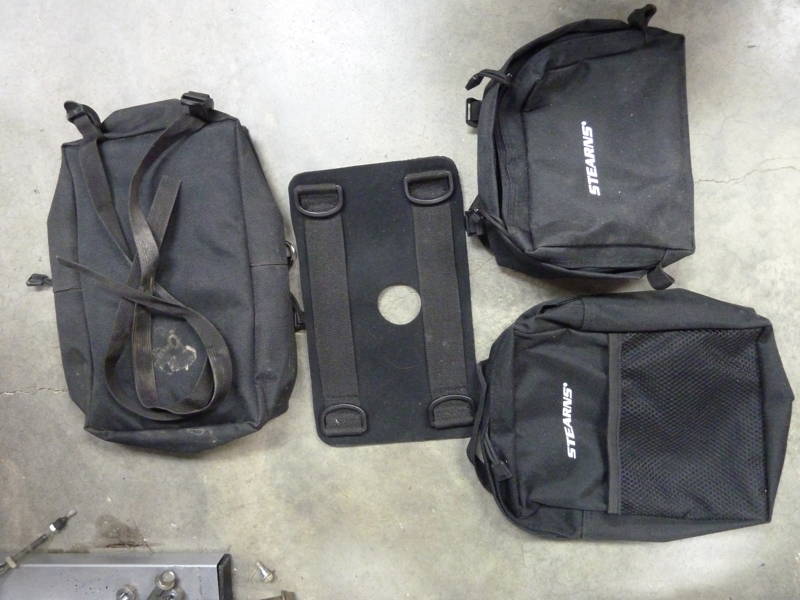
Bags (Spring 2011) - I decided I wanted to add some small bags to my 230F to carry extra riding gear and other small items. I had been strapping a small Stearns ATV bag onto the rear of the seat and onto the rear fender - it was big enough for my rain jacket. The bag was designed for ATVs but had straps that wrapped around the frame on my CRF230F just fine. But it was always in the way when I wanted to strap on my chainsaw for trail clearing work. This spring I bought several kinds of ATV tank bags and cobbled together a first attempt. I modified the part that goes over the tank/gas cap so the bags are carried higher. I put two small bags onto the carrier - one is small and holds my rain jacket, and the other is larger and holds gloves, extra silk jersey, and food. I'll be playing around with this setup to get the size bags I want and mounted so they're not in the way. Currently, my knees just touch the bags, so they're far enough forward, but I want them to sit a bit higher on the gas tank.
The three other pieces are what I'm now using. I enlarged the center hole of the carrier piece and modified it to hang the bags at an angle. The bags hang from the carrier via straps.
I bought the Stearns ATV bags at Walmart. I bought one set that fits over the tank (to get the carrier) and one set that fits on the fender (to get the smaller bags). The bags all come in camo or black. Here's a link for the tank bags Stearns-ATV-Tank-Bag
|
|
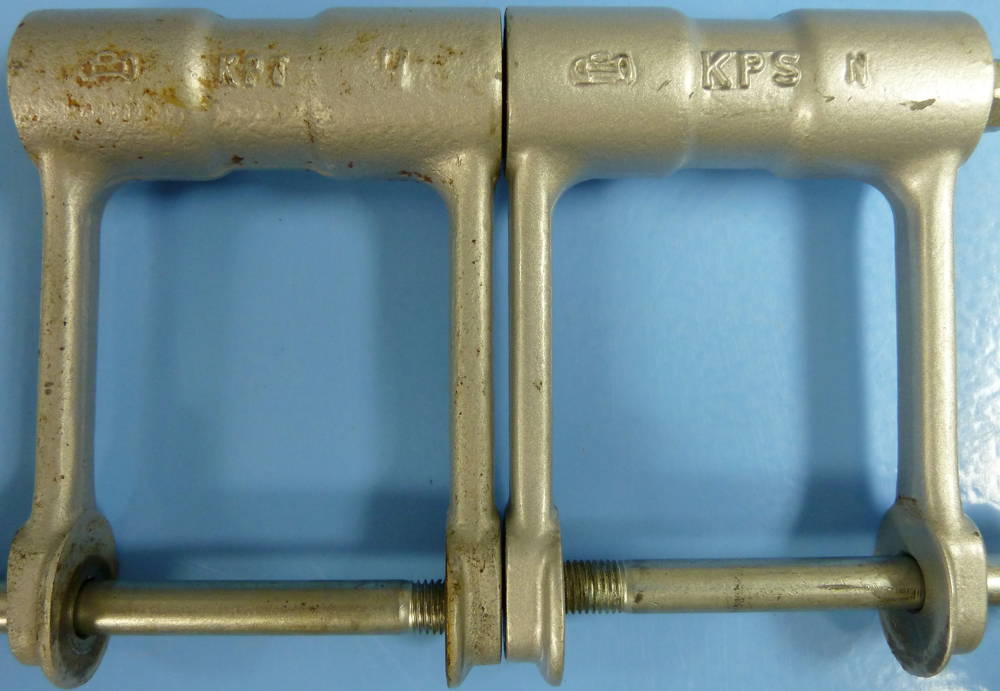
Mixing CRF 150F and 230F linkage - October 11, 2011
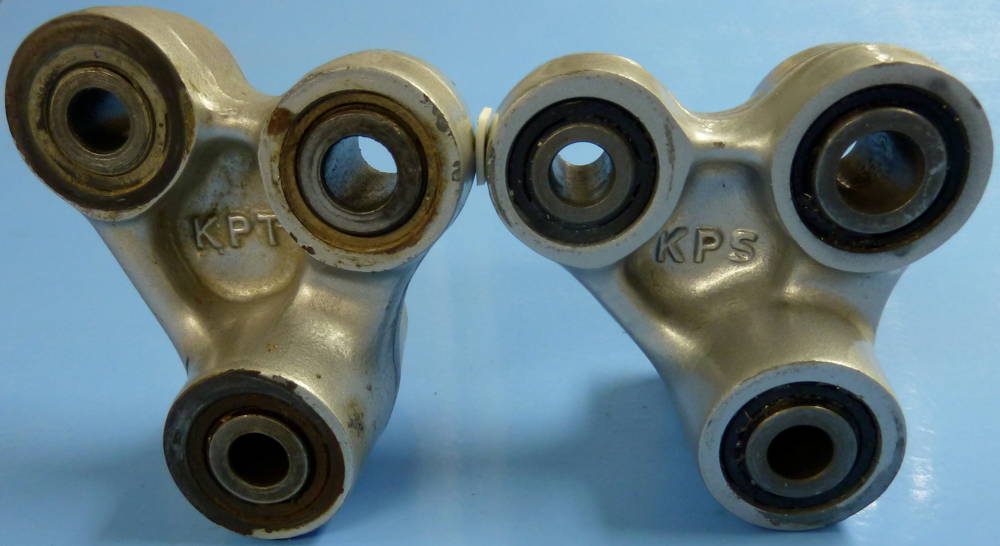
You can mix and match stock Honda suspension parts to get different seat heights. The parts to swap are the shock link and shock arm assemblies. I call these parts the link and rocker as they are commonly referred to by many riders. The link is the u-shaped part. The rocker is the triangle-shaped part. Both of these assemblies contain metal sleeves, needle bearings, and seals that are identical between the 150F and 230F, which is why the parts are interchangeable. To summarize:
Parts to test: Measuring The relevant measurements are the lowest and highest points of the seat. But these are too difficult to measure accurately - you need a level, ruler, and the bike must be vertical. It is easier and more accurate to measure from the ground to points on the frame with the bike held vertical. These measurements will indicate the relative seat heights. I chose two places to measure from:
M1 = from the ground to the lowest point on the paint label under the front of the seat
M2 = from the ground to the bottom of the metal sleeve in the muffler hanger I did all the swapping and measuring on a CRF230F, so if you have a CRF150F, you will get different results. The 230F I used for the measurements had no engine/tranny, gas tank, or seat, so the front and rear suspension was fully extended. You will get slightly different numbers when measuring a fully assembled and fueled 230F.
Here are pictures of the tested parts; the CRF150F part (labeled KPT) is on the left in each picture. The CRF230F part is labeled KPS.
Note that the distance between the pivot bolts on the 150F link is longer than the 230F link. I measured about 3.3mm longer.
Note that the 150F rocker is longer on the left and right sides than the 230F rocker, making the 150F part larger overall. I have mounted a trials tire on the rear of my CRF230F, and the larger outside diameter of this tire (compared to stock) raised the rear of my 230F axle about 5/8". To compensate for this extra height in the rear, I swapped in a 150F link, and this lowered the seat about 1/2" when the 230F is standing vertical, fully assembled, full gas tank, and with no rider aboard. |
||||||||||||||||||||||||||||||||||||||||||
|
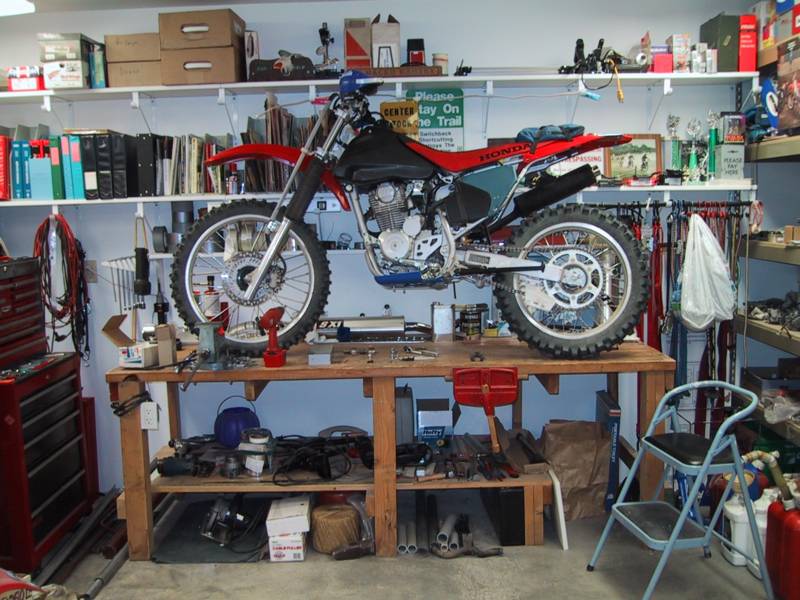
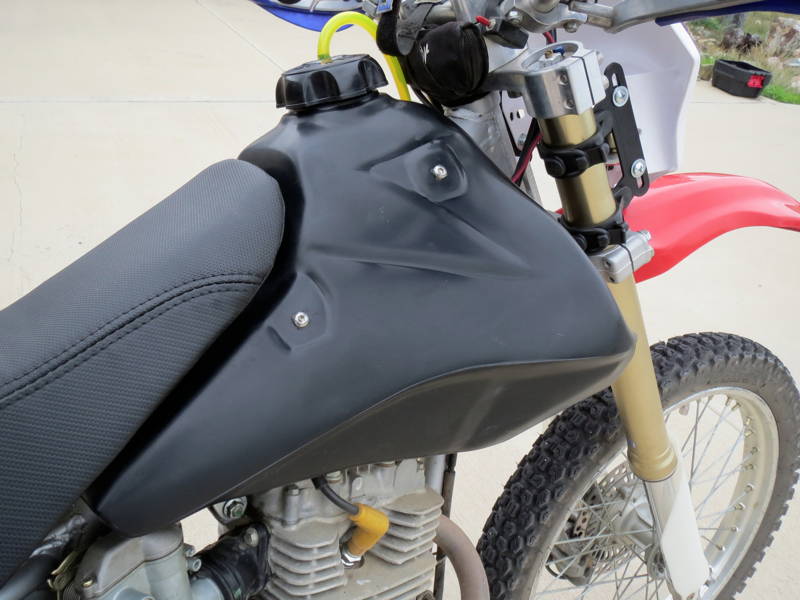
CRF231F update - September 13, 2013 I have two CRF230F motos and to distinguish between them, I call them CRF231F and CRF232F; the 1 and 2 denote the first and second 230Fs that I bought. Some time ago, the cam timing chain on the CRF231F stretched beyond spec and the chain came off the drive gear. The piston hit the valves and the top end was mangled. I removed the engine and made plans to upgrade it to an Engines Only 251, and bought all the parts to do the job. The engine languished on my work bench because I never seemed to find the time to complete the project. This summer, I got back into it and installed a 230F engine from a bike I bought last summer. (I never did finish the EO 251 project; maybe get to it this winter.) While I was doing the engine swap, I did a few other mods - fuel tank upgrade, seat upgrade, rear shock upgrade, new headlight, tank bags, and miscellaneous smaller details. Here's a picture of the bike in rideable form:
I installed a 3.0 gallon Clarke fuel tank to get increased range - should be good for about 150-170 miles now. I bought this tank from an inmate on a guess that it would fit either of my 230Fs - '03 and '05. Clarke says that it won't fit pre '08 models. In '08, Honda changed the stock tank, reducing it from 2.1 gal to 1.9 gal - good move Honda, reduce fuel capacity on the ultimate trail bike! Well, the Clarke tank fit, kinda. The tank mounting bolts and rear strap fit perfectly. However, the seat doesn't fit exactly - there's a small gap as you can see in the pictures. Some of the gap is due to the Seat Concepts seat mod, but the rest is due to the Clarke tank shaped to match the '08 and newer stock tank/seat design. I have no idea if the stock '03/'05 tank shrouds fit because I have never used them on any of my 230Fs. There is also a small problem with my CRF150R USD forks - they hit the tank before full swing of the triple clamps. I heated the front of the tank with a heat gun and turned the forks full-lock to deform the tank just enough to allow full swing. I inserted a 1/8 inch thick piece of split plastic hose on the forks before pressing into the tank to get some extra clearance. It all works fine and I really like the extra riding range! A friend installed the Clarke tank on his otherwise stock '09 CRF230F and the forks also hit. He added some rubber bumpers to the stock fork stops and solved the problem.
When fitting the CRF150R USD forks, I had to relocate the CDI from the front of the steering tube to a spot under the fuel tank. I moved the CDI box only (I set aside the bracket and rubber holder). I found it was easiest to disconnect the CDI and move it around until I found a spot that I liked, then connect the wiring, then use zip-ties to hold everything in place. I made sure that the plastic wiring connectors were not under any pressure from touching anything. There was adequate clearance from the fuel tank (I checked).
I added and changed quite a few parts while doing the engine replacement:
Several items remain to be installed/updated, but the bike is ready to go now. I've ridden it a few times and the Vee Rubber rear tire is the best DOT trials-like tire I've used. Vee Rubber rear tire specs:
4.00 R18 M/C 64L
Section width = 110 mm
Tire width, measured = 4" |
|
Wiring diagram The wiring diagram published in the CRF230F Honda Service Manual has 3 mistakes, as was shown in a post on ThumperTalk. The left diagram below shows the errors and the right diagram shows the corrected version. Click each to supersize; right-click to save a copy for yourself.
|
|
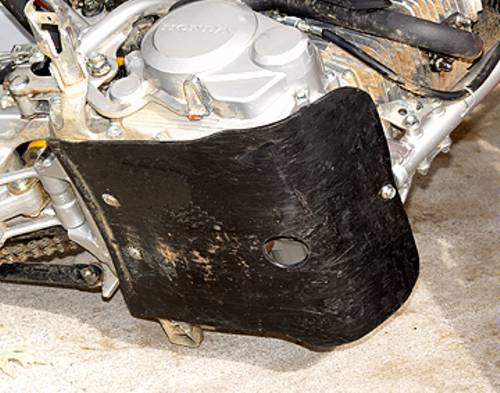
Gordon mods GordonB from Huntsville, AL made a very effective and easy-to-make skidplate for the 230F. |
|
|
|
|
This plastic is nearly 1/4" thick, and is extremely tough.
I've had one on my ATV for over six years, and it has never cracked
or broken. It's easy to cut with a band saw or jig saw, and can
be curved as desired with heat from a heat gun or propane torch.
I like it better than aluminum because it's lighter, doesn't dent,
and it has a bit of "give" to it to absorb impacts.
(Ed note - It's quieter than aluminum, also.) I've been using
mine for several weeks now, and it works very well.
This particular skidplate sells for about $75 and is available in red and black. Smaller skidplates are available for less, but I don't know their sizes, or if they are wide enough. |
|||
|
Other comments from Gordon I've not seen much benefit from the Power Up jetting. Using the stock front sprocket with a 54T rear sprocket (had to add one link and two master links to make it fit) seems the perfect combination for my riding. As well as being a good Trials play bike in the rocks and logs, it's no slouch in very tight and rough trails, either. I've been able to keep up with and often stay ahead of my friends on their 250s to 450s in the 5-15 mph sections of the woods. In the faster sections, of course, it runs out of horsepower and suspension pretty quickly. |
|||


DaveC mods DaveC lives in Colorado Springs. He modified his 230F by adding lighting and a few performance mods. Here are his comments: I installed an Acerbis Diamond headlight ($75) that required some modification. The headlight comes with three 20 watt bulbs, and I removed the smaller third bulb to limit the draw and allow sufficient battery charging. I plugged the hole with some scrap plastic and epoxy. This reduced the wattage consumption but still maintained adequate illumination for trail riding.
I checked the stator output myself. The manual states that
the system is rated at 65 watts. The actual was slightly higher,
but I still modified my lights to comply with Honda's specifications.
With the headlight, taillight, and brake light on, the system
draws 54 watts. |

The straps to connect the headlight to the forks are designed for larger forks, so I bought a bicycle inner tube ($2), cut it in half, and wrapped each half around the forks where the headlight connects. This produces a non-slip connection.
To operate the lights and eliminate the need for two separate
switches on the cramped handlebars, I purchased a Baja Designs
combo light and kill switch ($25, part #129020) and removed the
stock kill switch. (Editors note - Sano!)
|
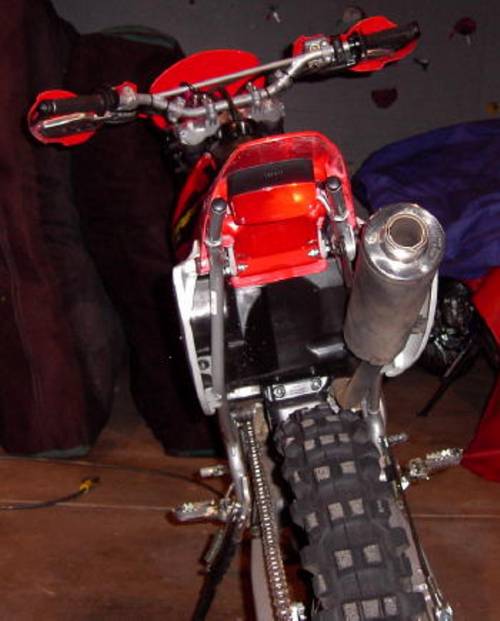
I purchased an Acerbis Modular Enduro Taillight ($36) and removed
the light from the fender piece that came with it. I turned the
light up-side-down and attached it to the under side of my rear
fender with two sheet metal screws. The screws protrude through
the fender under the seat and cannot be seen unless the seat
is removed. The light fits just right to allow visibility from
the rear but otherwise is not visible on the bike. When the rear
shock is completely compressed, the tire just misses the light.
(Editors note - this has to be the most unusual taillight mounting,
ever ;-)
|

The lighting kit is wired through the ignition key switch. I did
this after consulting several other motorcycle systems that come
stock with electric start and lighting. It is not currently fused.
However, I believe the power to the keyed ignition switch is
already fused.
The lighting setup works great. It's a good alternative for
those looking for a light kit that looks sleek and doesn't cost
too much. Total cost was about $150.
|
|
Jetting info The BBR rev limited did produce some minor performance increase, but I would say it does not justify the expense. Most riders probably would not notice. |

LeoA mods LeoA lives in Colorado Springs. He modified his 230F by adding lighting and a few performance mods. Here are his comments:
I did your jetting changes and some baffle mods. I will make
bigger holes now. Left the stock 102 main in as I ride lower
(Divide and Trout Creek area) often.
The bike is soft (poor throttle response) in the mid-range, but then again it only has about a half hour on it. Great response off the bottom. The lights turned out great. I made the harness myself. The dealer was kind enough to give me the OEM Honda connectors AND loan me the crimp tool!!! Hint on the brake switch - the bike is very hard to put a rear mechanical on it. I tried. Ended up putting a pressure switch on the front - replaces the banjo bolt. Fairly well protected, sits right under the bar and the wires don't stick out. Also on the headlight - the rev box makes for an interesting rube goldberg exercise! I got lucky - the UFO old XR copy design has a hole in the bottom-front. I was able to use 1 1/4" PVC spacers on the fork legs to a) make the rubber holders tight, and b) position the headlight correctly so the rev box sticks out some in that hole in the bottom below the lens.
I'll send you the Acerbis part number for the taillight. Went
on really slick with no cutting. I drilled holes through the
side support as the picture shows to route the wiring. |
|
Jetting info Main: 102 Pilot: Stock Needle: Stock Pilot screw: Stock Float level: Stock Jetting related Intake baffle: removed Exhaust baffle: modified Transmission vent filter: no Air filter: Stock Fuel grade: n/a Ride elevation: 8000 ft Other modifications Handguards: Enduro Engineering Skidplate: no Engine mods: no |
Manchester Honda 1/15/03 - November Motorcycle/ATV Service News - Author: Shane
You may remove the intake restrictor and exhaust diffuser on the CRF150F/230F, in order to get more power. When making these changes, change the needle and main jet as noted below.
Rick's note: Although this service note recommends the 132 main jet, testing has shown that jets from 120 through 128 provide better performance. The size that works best depends on elevation, temperature, exhaust pipe modifications, muffler modifications, air filter modifications, and air box modifications. The more free-flowing the intake and exhaust system, the larger the main jet should be for best performance. Higher elevations require smaller main jets.
Rick's note2: The Full Power / PowerUp needle is not recommended based on extensive testing and feedback over the years. The '03-'05 stock needle with 120 main jet performs best at sea level. Adjust for elevation, humidity, intake and exhaust mods, and cams.
Installing these parts is not difficult if you've ever worked on carburetors before. For those less knowledgeable, see the Carb Notes page for some detailed instructions and a few pictures.
|
CRF230F CRF230F Full Power Needle 16012-KPS-921 #132 Main Jet 99113-GHB-1320 |
CRF150F CRF150F Full Power Needle 16012-KPT-921 #115 Main Jet 99113-GHB-1150 |
|
|
No picture available. |
|
The bag contains the needle, clip, and needle jet (aka needle bushing). The needle jet is identical to the one already in the carb. It is provided in the bag so you can use it if the one in the carb is worn. You don't need to install it. (It takes years to wear one to the point of replacement.) Needle markings - CRF230F needles are marked with an alphanumeric code that you can barely read with the naked eye.
Stock needle '03-'05 16012-KPS-901 marked C39A Full Power needle 16012-KPS-921 marked C30FF The needle jets are not marked. The carburetor gasket set contains all the gaskets, seals, and o-rings in the carb: 16010-KCE-670 about $16 at Service Honda. |
Needle markings - CRF150F needles are marked with an alphanumeric code that you can barely read with the naked eye. Stock needle markings are not available; anyone got 'em?
Full Power needle 16012-KPT-921 marked B18L |
Excerpted part of Honda Bulletin dated 11/1/02

Thumper Talk charlieb 1/13/03
This is what I did to my wife's CRF230F. The dealer gave me
a tech bulletin showing what to hop up.
Remove the air box restrictor (leave the screen in). This restrictor
is located under the seat in the top part of the air box. Just
pull it up and out.
There is no restrictor between the carb and engine.
Remove the baffle from the muffler.
Replace the jet and needle set with part number 16012-KPS-921.
Put the clip in the middle position.
Replace the main jet with part number 99113-GHB-1320
These are all factory part numbers.
The main jet is a 132. I also purchased a 130 and 135 just
to see which works best but the 132 worked perfectly.
The bike has tons more power now and sounds a lot better. The
only disadvantage is it is a bit more picky on choke setting when
cold now.
Thumper Talk Keener, Lafayette, CO 3/15/03
For my wife's bike I will rejet today to a 132 or 135 main,
48 pilot, and the Power Up needle on the 3rd clip position from
Honda.
Part number for the needle is 16012-KPS-921
All restrictors removed and the bike is pitifully lean with stock
jetting. We ride at 5-9000 feet.
The 230 runs like a different machine with the new jetting. The 230 needs to be rejetted if you uncork it, and probably would like to run richer if left restricted.
This section is, of course, woefully out-of-date, but I'm leaving it as is so you can see the deplorable state of aftermarket parts we had to deal with back then.
Several companies have made, or will soon have available, aftermarket parts for the CRF150F and CRF230F. Here are several that I've tracked down. Click on the blue underlines for web sites.
Available now for the CRF230F:
| Air filter Aluminum frame Billet gas cap Exhaust pipe |
Graphics kit Heavy duty fork springs Heavy duty shock spring Rev box |
Shock linkage Skid plate Triple clamps Complete bike! |
Coming soon: Big-bore kit
SRC Summers Racing Components 800-221-9752
Fork brace kit
Heavy duty aluminum skid plate
Thumper Racing Order number 800-259-5186 Tech questions 903-938-3340
R&D on big-bore engine kits; nothing available till summer.
Works Performance 818-701-1010
CRF150F rear shock available now.
CRF230F rear shock available soon.
I order all Honda parts from Service Honda, 800-828-5498.
I order all other parts, tires, tubes, lubricants, etc. from:
Chaparral, 800-841-2960
RockyMountainATVMC
I ordered the Honda 2003 CRF230F Service Manual from Helm, Inc for about $48, including shipping.
 Helm
also has the parts fiche information available as a high-quality
booklet (8.5 x 11), which is much better than printing the fiche
yourself (see below). The booklet is bound with a heavy paper
cover and includes Part Number and Part Description indices. These
booklets have the same content as the XRs Only parts catalogs
back in the middle 80s but are much higher quality.
Helm
also has the parts fiche information available as a high-quality
booklet (8.5 x 11), which is much better than printing the fiche
yourself (see below). The booklet is bound with a heavy paper
cover and includes Part Number and Part Description indices. These
booklets have the same content as the XRs Only parts catalogs
back in the middle 80s but are much higher quality.
I ordered and received the Honda 2004 CRF230F Parts Catalog, which is Helm's nomenclature for the printed fiche. I also received the Honda 2004 CRF250R Parts Catalog that I ordered; it shows all the CRF250R secrets ;-)
I ordered the Honda 2003 CRF230F parts fiche from motocom.com for $17 and printed it on paper
at the library for .10 per page. motocom.com also has the Honda 2003 CRF230F Service Manual now.
I reviewed the '03-'04 Parts Catalog, looking for differences between the 2003 and 2004 models. The only differences I could find are the fender and tank shroud colors. 2003 is Fighting Red; 2004 is Extreme Red.