Honda CRF250X - Big Bore / Top End
June 28, 2017 version
|
BigBore/TopEnd |
|||
|
|
Honda CRF250X - Big Bore / Top EndJune 28, 2017 version
|
The Thumper Racing 270 kit consists of a new piston, rings, pin, and gaskets. Thumper will bore your cylinder and press in a new ductile liner. The kit increases displacement to 269cc, although Thumper calls it their 270 kit. The new piston has a flat top and 12 : 1 compression ratio. The piston skirt is wider than stock to increase longevity over the stock piston. Price is about $360 for the parts and $140 to install the liner. Thumper Racing web site
8/4/04 - I ordered the 270 kit from Thumper today, and sent them a new 250X cylinder, so they could bore it and install the new liner. The new cylinder was an extra I had previously ordered from Service Honda (12100-KRN-672 $149), so I didn't have to have the 250X down while waiting for parts.
8/27/04 - I got the big-bore kit today. The piston is made by Wiseco, and the gaskets are from Cometic. My plan is to install the kit when my 250X gets to 2000 miles, sometime in Nov or so.
10/18/04 - I now have 2000 miles on my 250X, and it's time to start the big-bore work.
But, I had a change in plans. I plan to install the '05 CRF250R head at the same time as the big-bore kit. Tuner on Thumpertalk already did the big-bore and '05 head mods and is very happy with the results. The '05 250R head has a new intake port shape. The new port shape is an oval configuration designed to boost intake charge speed for better throttle response at low and mid-range. Tuner felt that it did just that. I will be sticking with the stock Honda '04 250X valves and springs; I have had no valve problems in 2000 miles of riding and see no reason to change.
I ordered the head and a few other parts from Service Honda today. Now I'll have to just wait a bit until the parts show up.

10/25/04 - The new '05 CRF250R head came
in today. I had new valves and valve guide seals on hand from
a previous order. Other parts are on the way.

I found some curious markings inscribed on the new head. You'll
have to click on the picture to see them clearly. The cam holder
clamps have "313" and "R" inscribed on each
face. The front of the head has "R313" inscribed on
the left and "GR" and "37" on the right. I
think GR are a person's initials, but I have no idea about the
numbers. There are also numbers on my old head; same pattern -
different values. If anyone knows what all this means, drop me
an e-note.
Does that head look trick, or what?
EDIT: The numbers are used to keep the parts together as a 'set'; they are assembled and then line bored. Parts from other 'sets' may not interchange.
11/28-04 - I did the initial tasks
to get ready to install the new piston, cylinder, and head. I
checked the compression (57 psi) and the valve clearances (all
ok); there was 2287 miles showing on the odometer. I'll pull everything
apart tomorrow.

12/7/04 - After a few aborted
starts, I finally managed to take all the top end parts off. Removing
the cylinder requires that you remove the carb, also. And that
means the sub-frame at least has to swing up and away. I'm also
doing a rear shock linkage service, so that means the shock comes
out. And on and on.

I'll be measuring and checking things out for several days
before I start reassembling.

When Thumper says their piston skirt is wider than stock, which
reduces rocking of the piston in the bore, this is what they mean.
The front and rear skirts are wider, left-to-right, than the stock
skirts. The Thumper piston is the same height as the stock piston.
Notice the blow-by on the old piston? It's actually not as bad
as I thought it would be; there's virtually none below the rings.
A rockhound friend weighed the stock and ThumperRacing piston
assemblies on her very accurate scale. The weights are: stock
- 183 grams and ThumperRacing - 211 grams. That's about 15 % heavier
for the ThumperRacing assembly. The assembly includes the piston,
rings, pin, and clips.

12/28/04 - Here's a brand new
stock Honda intake valve on the left and my right-front intake
valve on the right. My valve has about 2287 miles on it. When
my scanning electron microscope arrives, I'll take some really
close-up shots of the surface so I can see how much of the valve
coating material wore off. Or I may use my atomic cantilever-tip
mass sensor. Until then, I'll just look at the valve surface and
angle of the mating surface to see if any wear is apparent. It
looks pretty good to me. I can just barely see some very minor
wear. When using my magnifier headband and close-up loupe, I can
detect the tiniest bit of what I call cupping or feathering of
the edge. Not much, but it's the start of what could be "valve
recession". I'm thinking my own personal valve replacement
schedule is going to be right at 2,500 miles, or about a year
of riding.
Please ignore the small white specks. They are nearly invisible
to the naked eye, and I didn't see them until after I took the
pictures. That'll teach me to keep a cleaner engine work area!

1/6/05 - I don't believe it. No sooner
did I made a wisecrack about a scanning electron microscope when
CaptainJ posts on ThumperTalk that he actually DOES have
access to a scanning electron microscope and actually used it
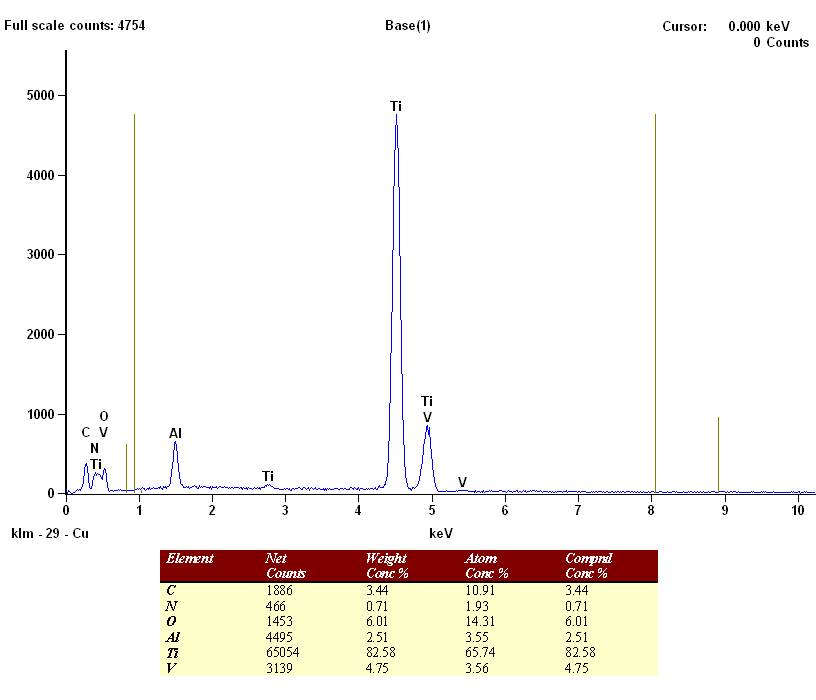
to take pictures and analyze an intake valve. Here is an excerpt
from his post, along with an SEM picture and component analysis
of the valve:
"Just thought I'd add a little more to the valve discussion.
I work for a medical device company where I have access to a scanning
electron microscope everyday. Granted, most people don't look
at their engines like this, but I thought I would take advantage
of this and share it with the forum. When the Honda dealer first
handed me my intake valves from the recent valve job they did
for me I was real skeptical. I had heard that the valves were
Titanium. Some were saying that there was only a Titanium oxide
on the valve face that quickly wore off due to dirt, etc. Here
is a picture of the valve and the results of the scan taken to
identify the components of the valve itself. The readings were
taken of both the valve face and the stem. Both readings conclude
that the whole valve is made of Titanium 6-4 grade. It also shows
that there is a slight recession on the face although looking
back, I'm not sure if I would have replaced them myself. Hope
this helps."
Oil Squirter Jet
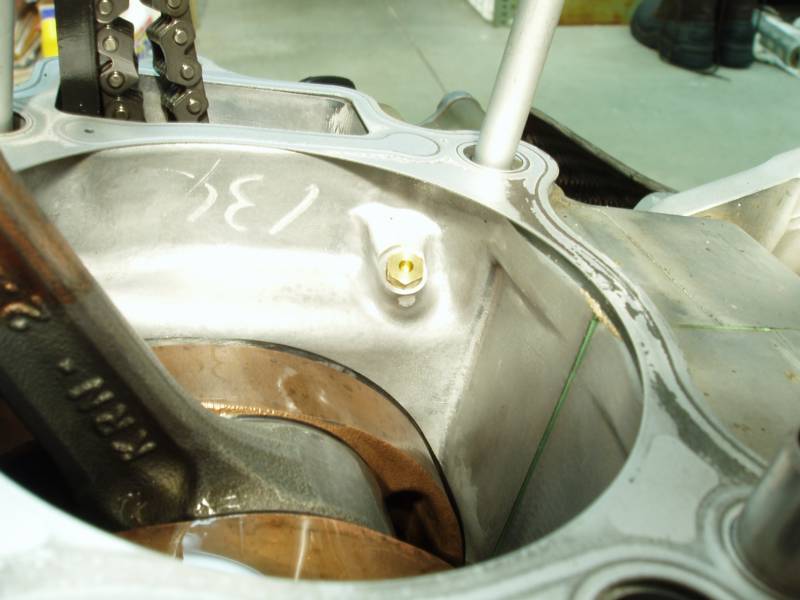
This small oil squirter jet on the left crankcase has changed
over time. The history on the X
is:
'04 and '05 - oil jet (#100)
'06 - piston jet (#80) and bolt
'07 - orifice (#170)
The '06 and '07 X cylinder will not work on the '04 and '05 X crankcase because of the different design of the oil jet. But you can modify the newer cylinder to work with the older crankcase.
The R oil squirter jet was changed in '05, a year earlier than the X. Motocross Action magazine has an article in their February '05 issue showing the '04 and '05 R cases with the '05 R cylinder. It is clear that the new R cylinder will not work with the '04 R cases.
Eric Gorr wrote the "Honda CRF Performance Handbook", a 125-page full-color book that provides Honda CRF250R/450R owners with detailed do-it-yourself tips on installing 31 popular aftermarket performance accessories. This book combines honest servicing tips in conjunction with the real costs of installing hop-up parts and exactly what tools and extra parts are needed to do the job right the first time. Price: $18.00. See Eric Gorr's web site for details.
A sample of the book is available as a PDF file on his web site. The sample shows Chapter 7, "How to Install an Aftermarket High-Compression Piston Kit." The last page of the chapter (p 9) shows where to cut a relief in an '05 R cylinder that is being installed in an '04 R engine. This relief allows the oil squirter to work correctly. You can perform this mod on an X cylinder also.
You MUST perform this modification when installing an '06-'07 X cylinder in an '04-'05 X engine or when installing an '05-'07 R cylinder in an '04 R engine.
There is an exception. If you update the '04-'05 X or '04 R oil squirter in the crankcase to the newer design, the newer cylinder does not need to be modified.
NOTE: I read about the cylinder mod on ThumperTalk, but neglected to get the riders name or note the topic and date. I also saw the cylinder mod in one of the dirt bike magazines, but don't recall which one. Lastly, I dimly recall seeing the oil squirter update, but don't recall whether it was on the web or in a magazine. Unfortunately, whenever I saw the mod, I decided it was not important to me because I thought I'd never put a newer cylinder on my '04 250X. How short sighted was that?
NOTE: The Thumper Racing 270 kit (which I am using here) includes a modification to the cylinder skirt so it will work with any crankcase and oil squirter.
I have no information on the Athena big-bore kit or others on how the oil squirter is accommodated with their cylinders.
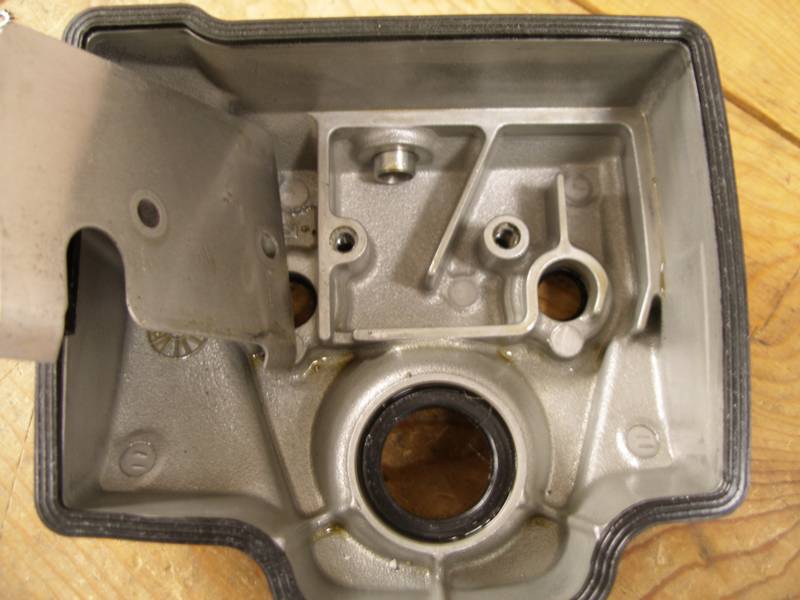
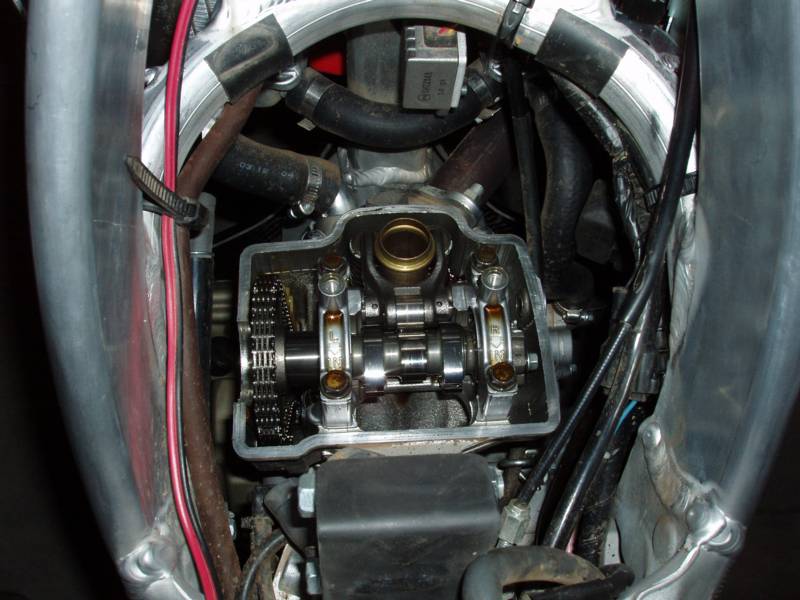
Ever wonder what was under the plate on the underside of the
valve cover? Me too. The bolts came out with some difficulty because
they're covered with thread locker. I kinda figured there would
be some sort of labyrinth to slow the venting gases down a bit,
and sure enough, that's just what I found. There was absolutely
no gunk and very little surface oil, so I will probably never
take the cover off again. I DID put thread locker on the bolts
before reinstalling them; don't want anything dropping on the
spinning cam.
Carb work
I adjusted the throttle position sensor; it was off about 100 ohms. The improper setting probably did not affect anything to any great extent. The bike has always started and idled just fine.
I checked the carb interior pretty carefully and did not find any dirt or dust. I swabbed the drain hose and the four vent hoses, and they came up pretty clean. The hose routing and filters that I used seemed to be adequate to stop dust intrusion. There was a very light coating of dust on one small part of the plastic throttle drum cover but not enough to raise any alarms. I did notice that the cover snaps into place; I had not noticed that when I worked on the carb in Feb.
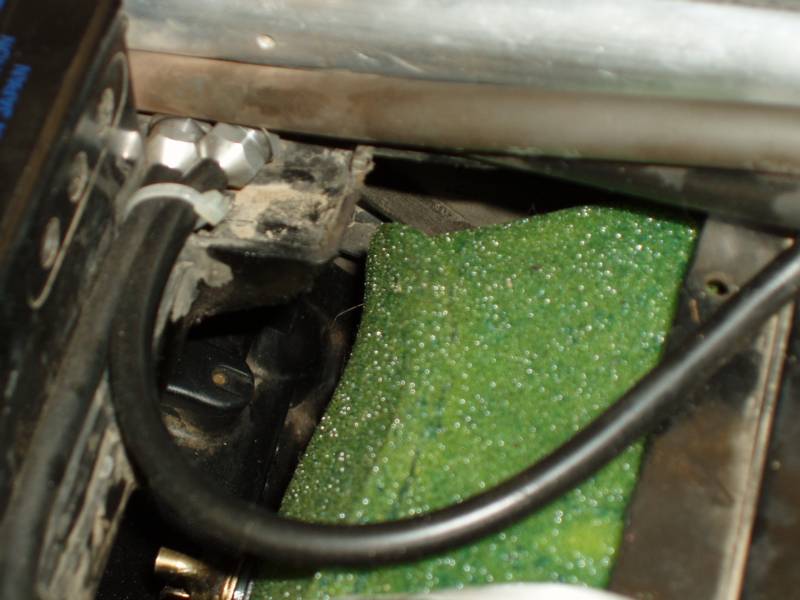
I had previously routed the two upper carb vent hoses into
the top of the airbox, and they were clean as noted. However,
I decided to add some filters to the hose ends and get them out
of the airbox. The DuBro filters mentioned on a ThumperTalk thread
come in two sizes. I used two of the smaller size. I put some
air filter foam inside each, pushed them onto the hoses (they're
a tight fit, so no hose retainer was used), then zip tied the
hoses so they ride at the top left rear of the airbox. I tucked
the ends of the filters under the hose and frame in the area.
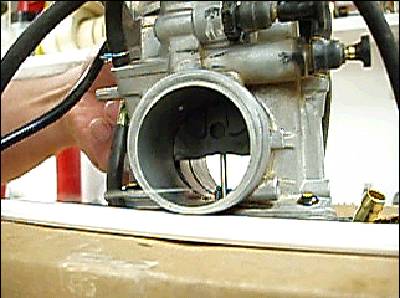
Testing the accelerator
pump on the carb.
Make sure there is fuel in the float bowl. Twist the throttle
drum.
Try viewing one of these short movies.
I'm trying several formats, so let me know if you have problems
(or opinions):
CarbSquirt.AVI 231KB
CarbSquirt.MOV 375KB
CarbSquirtSC.MOV 597KB
If you look carefully at the picture above, you'll notice the hot-start valve is not stock. I removed the stock hot-start valve, the cable, and the lever on the clutch perch, and replaced them with a short-pull, hot-start valve. I have never used the hot start for starting; if the carb is jetted correctly, you don't need it. On my DVD, you can hear the sound of the engine when I use the electric start and when I'm riding, and you should be able to tell that the jetting is spot on. One benefit of the missing cable is easier carb removal. Also, because I have removed the push throttle cable, the carb rotates easily to allow me to do jetting changes easier. But alas, I've never used this feature. I jetted the carb once during break-in and have never changed anything since except for minor adjustments to the extended fuel screw.

Here's a better picture of the hot-start valve. I got the valve
from Carburetor Parts Warehouse. It's like the old-style valve
that came on the Yamaha YZF and WRF carbs. It sits higher and
further inboard than the choke, so it's not easily confused with
that control.
Running position is 'pushed in' for both choke and hot start.
Gasket puzzle
Before I began the top end reassembly, I had a look at the Cometic gaskets supplied in the 270 kit. The cylinder base gasket that sits on the cases looked exactly like the stock Honda gasket.
The head gasket was another story. The stock Honda gasket that I removed from the bike and a brand new Honda '04 250X gasket that I had ordered previously were both 2-layer metal gaskets, about .4mm thick. The Cometic gasket is a 3-layer metal gasket, about .65mm thick. I also had on hand a stock Honda '05 250R gasket, and it is a 3-layer gasket, about .65mm thick as well. Here's a list of the gaskets:
| 12251-KRN-671 | '04 X and R | 2-layer, .4mm |
| 12251-KRN-731 | '05 R | 3-layer, .65mm |
| H2069 Cometic | '04 CRF250 81mm bore | 3-layer, .65mm |
Because I'm using the '05 R head, I should be using the '05 R head gasket, and the Cometic is a match, so that's ok. What puzzles me is why Honda went to the thicker gasket on the '05 R. The thicker gasket will reduce the compression ratio slightly. Did Honda do this to match the intake port differences?
I think Thumper went with the thicker Cometic gasket because
(choose one or more, or none):
a) they wanted to reduce the compression ratio (for longevity?),
b) they found out that the '05 R had a thicker gasket and thought
it was a good idea,
c) wanted one gasket that would work with '04 / '05 and X / R
(a bit weak on the reason, here).
1/24/05 - I assembled the top end without problems. The new cylinder (with new liner) and Thumper piston went on easily. I was careful not to drop a clip into the bottom end ;-)
On the workbench, I installed the new valves (and other related parts) in the '05 R head and then installed the cam to check the valve clearances. Intakes were both tight at .004 and exhausts were both ok at .011. I planned to recheck the valve clearance after break-in, so I went with the shims that were in it. Then I removed the cam to install the head on the engine, and it went on top of the cylinder with no problems. The cam slipped in under the chain with some wiggling, and then the engine work was soon over.
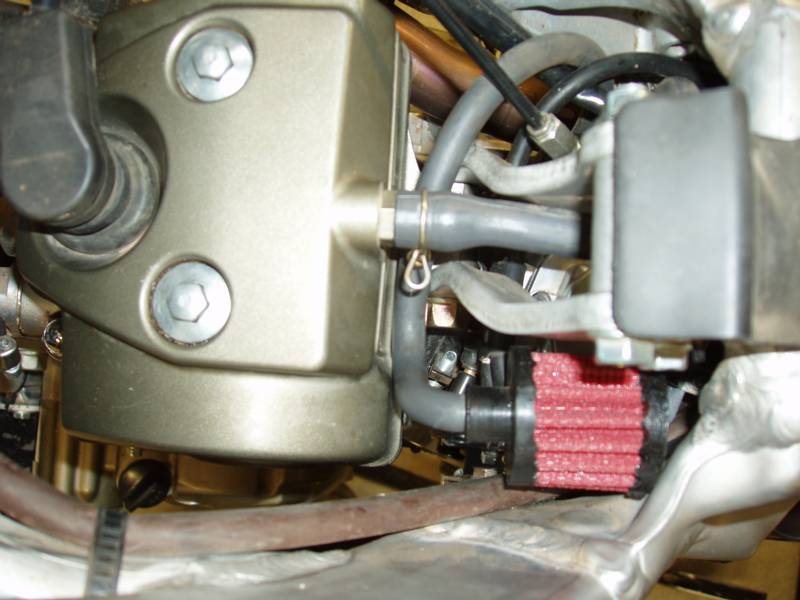
I added a filter to the end of the upper tranny vent hose and tucked it into the spot shown. It fits perfectly and is held in place by the fuel tank from above.
The carb, subframe, and exhaust were next to install. The fuel
tank and seat were the final bits to be mounted.
After assembly, I did a few short break-in rides for thermal cycling,
then rode 50 miles of easy dirt roads and trails, followed by
10 miles of more challenging terrain. Back in the garage, I checked
the valve clearances. Intakes were still tight at .004 and exhausts
were ok at .011. I'll order some new intake shims tomorrow. I
plan to change the oil and filter before the next ride.
So, how did it feel? Terrific! Even though I took it easy and didn't ride any high-elevation technical trails, I did manage to give it a good shakedown. The bike feels much stronger on the low end and mid range. It pulls and pulls in second and third on hills like it never did before. It feels more like, dare I say it, a strong XR280 than a peaky CRFX. It has a really impressive "crawl" feeling. But it still has that CRFX peak power!
It's impossible for me to say which contributed the most to the improved performance - the 270 kit or the '05 R head. I've done 280 kits on XRs and seen similar mid-range performance improvements over stock, so I'm betting the 270 kit was the biggest factor. Based on other comments I've read about the R head, I think it also added a significant but lesser performance improvement. I recommend doing both of these mods at the same time for maximum improvement. Keep in mind that my 250X has the exhaust baffle drilled and part of the airbox top cut out, but is otherwise stock. If you have made the CCC mods, you may not see as much performance improvement.
Break-in is finished, and I'm seeing the performance that I'll be enjoying for the rest of the year. I'm looking forward to riding on the good trails this summer.
I spent $500 for the 270 kit, about $375 for the '05 250R head, valves, and other parts, and $150 for a new cylinder, for a total of about $1025. I bought the cylinder to allow Thumper to install the new liner while I was still riding the stock bike.
Is the performance increase worth what I spent? You bet.
Oh, my wife says I sure look goofy walking around with a silly grin on my face ;-)
Honda parts and prices
When I bought the '05 250R cylinder head assembly, I decided to use some parts from my old 250X head because they were in great condition. I did order new valves and springs and a few other items. I think I could have gotten by with the old valves and springs because they looked good and measured within tolerance, but I'd probably kick myself if I ended up with valve recession problems using the old valves. You may decide to go with all new parts or reuse more than I did, but make sure the reused parts are in good condition.
|
Service Honda Prices for '05 CRF250R Head and Associated Parts (1/25/05) |
|||
| Description | Part number |
Price, each |
Price, total |
| '05 Cylinder head assy - '05 250R | 12010-KRN-730 |
210.64 |
210.64 |
| Bolt, stud (8x22) - 250X, 2 each | 92900-08022-0B |
.65 |
1.30 |
| Joint, water - '05 250R | 19523-KRN-730 |
8.13 |
8.13 |
| O-ring (19x3) - 250X | 91312-KE7-003 |
1.20 |
1.20 |
| Bolt, flange (6x20) - '05 250R | 96001-06020-00 |
.59 |
.59 |
| Spring, in, valve - 250X, 2 each | 14751-KRN-670 |
3.34 |
6.68 |
| Spring, ex, valve - 250X, 2 each | 14761-KRN-670 |
3.97 |
7.94 |
| Valve, in - 250X, 2 each | 14711-KRN-670 |
43.50 |
87.00 |
| Valve, ex - 250X, 2 each | 14721-KRN-670 |
25.07 |
50.14 |
| Seal, valve stem - 250X, 4 each | 12209-GB4-681 |
3.91 |
15.64 |
| Seal, ring - 250X | 12226-MEB-670 |
1.57 |
1.57 |
| Gasket, exhaust pipe - 250X | 18291-MM5-860 |
2.64 |
2.64 |
| camshaft, cam bearing cam decompression parts cam thrust washers cam chain tensioner lifter assembly cam chain, guide, and tensioner rocker arm, shaft, and cap |
valve lifters, valve cotters valve spring retainers and seats cylinder stud nuts and washers cylinder head mounting bolts dowel pins |
The valve shims are also not shown because each engine requires specific fitted shims.
Cylinder and head gaskets are from Thumper (included in the big bore kit).
Big Bore Kit v2

In November of 2006, my 250X rolled over 6000 miles on the
odometer, and I decided to refurbish the top end. I ordered another
Thumper Racing piston kit and gaskets. I have the ductile liner
in my current cylinder from the first big bore install, so I didn't
have to buy that. I plan to deglaze the cylinder and install the
new piston/rings.
I also plan to install an '07 R head with
some Ron Hamp components - all four valve springs/locaters/retainers
and a set of coated Ferrea steel intake valves.

11/18/06 - I removed the seat,
tank/shrouds, exhaust muffler and header, and drained the coolant.
I checked the valves clearances and they were fine - .005 IN and
.010 EX. These valves have about 3700 miles on them (since the
first rebuild) and they've lasted longer than I expected. They
look like they could go another 1000 miles! Of the four, the right
intake is in the best shape with almost no on buildup on the
top side and the nicest valve face of all.
I removed the head, cylinder, and piston, then struggled to
get the carb out. I AM going to reroute those hoses. I checked
the squirter on the carb and it was fine. A brief inspection showed
no dirt anywhere in the carb. I checked the TPS and it was ok,
also. I adjusted the jetting for winter riding and set the carb
aside. That's enough for today.
11/23/06 - I installed the valves, springs, and cam in the new head and got the initial shimming installed. Before installation, I weighed all the sprung valve components. Weights are in grams.
|
OEM |
Ferrea |
Diff |
Percent |
||
| IN valve |
18 |
28 |
10 |
56 |
(heavier) |
| Spring |
21 |
18 |
-3 |
-14 |
|
| Retainer |
5 |
3 |
-2 |
-40 |
|
| Cotters |
<1 |
<1 |
0 |
||
| Total |
45 |
50 |
5 |
11 |
(heavier) |
|
OEM |
Ferrea |
Diff |
Percent |
||
| EX valve |
25 |
25 |
0 |
0 |
All OEM |
| Spring |
30 |
25 |
-5 |
-17 |
|
| Retainer |
5 |
3 |
-2 |
-40 |
|
| Cotters |
<1 |
<1 |
0 |
||
| Total |
60 |
53 |
-7 |
-12 |
(lighter) |
Although the steel intake valve is heavier, the lighter spring and retainer kept the overall weight gain to a very acceptable 11%. On the exhaust valve side, I used the stock Honda exhaust valve (no change in valve weight), and the overall weight is down 12%, again due to the lighter spring and retainer.
BTW, the old stock Honda springs that I removed were still in spec on free length (IN 39 and EX 43). The new Ferrea springs are IN 45.6 and EX 44.1 free length.

Here is the stock piston (on the bottom, upside down), the
first 270 piston (middle), and the newest 270 piston (top). Notice
the skirt widths - the TR #1 piston is substantially wider than
stock, but the TR #2 piston, although still wider than stock,
is a bit narrower than the TR #1 piston. The webbing on the bottom
of the TR #2 piston is very slightly thicker than the TR #1 piston.
I weighed the stock and ThumperRacing piston assemblies (includes
the piston, rings, pin, and clips) on my electronic postal scale.
The weights are:
stock - 183 grams,
TR #1 - 212 grams,
TR #2 - 211 grams.
That's about 15 % heavier for the ThumperRacing assemblies.
6/28/17 - PAUSE
For various reasons, I suspended work on the second big bore installation in November 2006. Parts were boxed up, the engine in the frame was covered, and the 250X moved to the side of the work area. Where it sat for a good many years. I took an interest in riding and fixing up my CRF230F, and eventually bought a second one. The 250X sat in the dark, waiting patiently. From time to time, I did some of the re-assembly process and eventually completed assembly of the head.
In the spring of 2017, I began re-assembly in earnest. The engine was finished and I installed the modified carb. I had added a Boyesen Quick Shot 3, an adjustable leak jet system, upgraded the accelerator pump diaphragm, and installed a Merge Racing accelerator pump spring. All of these changes were intended to make the accelerator pump system more trouble-free and easily tuned. But alas, the carb performed erratically and I had to take drastic steps to correct the situation.
Eventually, I went back to the stock Honda accelerator pump parts, but even that did not fix the problem. I bought the Keihin FCR MX Mid-Body Gasket Kit from CRFsOnly and split the carb body, where I found a small rubber piece and a partially obstructed hole. After clean-up and reassembly, the carb worked perfectly.

In this picture, the carb body has been separated into two pieces with the removal of the 4 black screws.
The new gaskets are in the plastic bag, and were not needed after all.
If you click this picture, a larger one will be displayed which shows a rubber smear near the two holes at the top of the lower carb piece. The rubber debris was in this area, and the very small hole just below had some minor build-up inside.
There was loc-tight residue on the black screws when I removed them initially, so I used loc-tight during reassembly.

The assembled carb, ready for installation.

This is the airbox connecting tube which attaches to the rear of the carb. Note the small oval opening on the lower arc which matches the two small holes in the rear of the carb (see carb picture above). I was quite surprised to find this, as I thought I knew all about the airbox, but I had never seen this opening, nor heard nor read about it. The opening is the end of a separate duct that is fed by filtered air. I suspect the separate feed keeps the air going to the small holes in a calmer state than the main flow.
After I verified the engine was working correctly and the jetting was adjusted correctly, I sold the 250X to a friend who has a 16 year old son for whom the bike is intended. Done and done.


Things to watch out for during
assembly (page numbers are for the
Honda CRF250X Service Manual)
- Oil ring spacer ends - don't overlap the ends of the
ring. Final check this just as you slide the piston into the cylinder!
(page 9-7)
- Set ring gap spacing around piston correctly. Final check
this just as you slide the piston into the cylinder! (page 9-7)
- Make sure the bottom of the white plastic cam chain guide
is seated correctly. (page 8-15)
- Install with great care and attention to detail the cam
set rings and then the camshaft holders. (page 8-27)
- After the cam is installed, install the cam chain tensioner
lifter assembly with the foot retracted, then release the foot, SLOWLY.
(pages 9-9 then 8-28)
- Before installing the spark plug and the valve cover,
turn the engine over with the kick start (by hand) to inspect
the cam and compression release mechanism to see that they operate
correctly.
You will hear a loud click on each activation, once per revolution.
- After turning the engine over several revolutions, bring
the engine to the correct TDC and re-check the valve clearances.
 Crank
timing gear TDC alignment
Crank
timing gear TDC alignment
Several companies offer big bore kits. Some kits are complete bolt-on, some require cylinder boring, and some require case machining. Stroked cranks are used for maximum displacement.
If you have any information that differs from or is more complete than what I show, please contact me via e-mail.
| Kit name |
Bore mm |
Stroke mm |
Displ cc |
Comp ratio |
Cylinder |
Cylinder plating |
Cyl skirt thickness |
Case machining |
Cost estimate |
| Stock | 78.0 | 52.2 | 249.4 | 12.9 | - | Plated alum | 3.5 | - | - |
| Athena 280 | 82.0 | 52.2 | 276.7 | 13.1 | New | Nickel-carbide |
|
Minor cleanup |
630 |
| Crowerpower 270 | 81.0 | 52.2 | 269.0 | 13.5 | New w/steel liner | ?? | No | 859 | |
| Ice Cube 276 | 82.0 | 52.2 | 276.7 | New | Apticote 2000 ceramic | Yes | 1000 | ||
| Ice Cube 302 | 82.0 | 57.2 | 302.1 | New | Apticote 2000 ceramic | Yes | 2400 DIY 2600 TDI |
||
| Thumper Racing 270 | 81.0 | 52.2 | 269.0 | 12.0 | Bore, install ductile liner | None | 2.1 - 2.2 | No | 500 |
| TMR 3xx | 3xx | New | Yes | ||||||
| Vertex 300 | 84.0 | 52.2 | 289.3 | New | Nikasil | Yes | 615 |
Other kits
CRF250 265cc Big bore kit 13:1 compression JE 80mm piston $450 on your cylinder (2005 and newer cylinder only).
CRF250R, CRF250X Athena 280CC Big Bore kit. 82mm Moly coated Forged 13-1 compression. No cylinder head or crankcase modifications necessary. Bolt on kit. (Nikasil plated cylinder, piston kit and gaskets.) $600.00 or $550.00 if you send us your old cylinder (2005 and newer cylinder only).
CRF250 300cc 84mm big bore kit. Case Mod required. Brand New Vertex Nikasil plated cylinder, 84mm Vertex piston kit (piston,rings,pin and clips) and cometic gasket set $615.00.
June 2006: NEW BIG BORE SLEEVES
New for 2006 is our big bore sleeve for Honda's CRF 250. Designed specifically to work with the OEM cylinder, our custom wet sleeve works reliably and adds stability to the cylinder at the larger bore sizes.
The CRF 250 big bore will give you just the added "oomph" to get you through the trees just a bit better. Our sleeve can be packaged with two piston options: 262cc utilizing JE's 80mm 13:1 or 276cc with CP's 12.5:1 82mm piston. Either way, you'll be very pleased with the basic boost this upgrade provides.
2006 head: '06 X 49-state vs
'06 R (For 2007 info, skip down a bit.)
I ordered an '06 49-state X head and an '06 R head from Service Honda, and spent some time measuring and inspecting the heads.
The '06 49-state X head is identical to the R head except for
the following:
- the spark plug tube is brass on the X and aluminum on
the R,
- the intake ports are round on the X and oval on the R,
- the exhaust ports are round on the X and small oval on
the R,
- the X head weighs 2078g; the R head weighs 2090g.

Intake ports - only the left intake ports are shown; X on the left; R on the right.
On the R head, the oval intake port is D shaped, with the flat
on the bottom. Unfortunately, the camera angle is different, and
the oval shape is exaggerated on the R, but it really is very
pronounced. Note the valve guide casting shape at the top! This
indicates how much lower the top of the port is.

Exhaust ports; X on the left; R on the right.
On the R head, the small oval exhaust port is D shaped, with
the flat on the top. Note the valve guide casting shape here also.
I also compared both '06 heads with an older '04 49-state X head, and visually, they appear interchangeable. The '06 R head should work on all '04, '05, and '06 X models (49-state and CA) and all '04 and '05 R models.
12010-KRN-674 '06 X 49-state head
12010-KSC-773 '06 X CA head
12010-KRN-850 '06 R head
2007 head: '06 X 49-state vs
'06 R vs '07 R
I ordered the '07 R head from Service Honda in Aug '06 ($214.70). Externally, the '07 R head is visually identical to the '06 R head, and the same goes for internal appearances, except for the intake and exhaust ports/runners. There is a definite difference between the two years in all four runners. From what I can see with a quick once over, the '07 R ports are smaller than the '06 R ports, and the runners have a different arch to them.

Looking at the intake ports, from left to right, you can see the development from a round port ('06 X) to a 'd' port ('06 R) to a smaller 'd' port ('07 R). Comparing the '06 and '07 ports, I estimate the '07 port is 5-10% smaller overall, and the port divider is extended towards the intake about 5/16" more creating a longer divided runner on the '07.
Not shown is what the ports look like on the combustion chamber
side. The R runners have a very wide arc just past the valve guides,
whereas, the X runners are fairly steep. That is, the R runners
are more open once past the valve guides where they run to the
combustion chamber.

The exhaust ports have a similar development, from very
open to more restrictive. The X has very large round ports, while
both R heads have flatter d-shaped ports. On the '07, the ports
are further reduced by the shaped smaller openings near the exhaust
pipe, both at the top and bottom. The upper part of the '07 runners
are more curved and open as they curve to the valve guides than
on the '06. The port divider on the '07 is much shorter (about
3/8") than on the '06.
Holding these heads in my hands and using my thumb as a sensing tool, I can definitely feel the smallness of the '07 ports. And I can detect a smoother arc in the runners on the '07 head. I don't have any fancy bench flow testers, but what my visual and tactile senses tell me is that the new '07 head will have much greater intake and exhaust flow velocity, which will enhance engine performance. I'm looking for much better carburetion with the '07 head in conjunction with the Thumper Racing 270 kit.
All of this analysis leads me to believe that Honda has been very busy transferring their race bike head technology to the production line. It is very difficult to transfer hand flowed port work to production castings with no post-production machining required. It looks like Honda is making the effort, and it looks like excellent work to me.
This '07 R head supersedes the '06 R head; if you order the '06 R head, you get the '07 R head instead. The new part number is - 12010-KRN-A00.
An advantage to using the '07 R head on an '07 X is that the holes for the secondary air injection system are not on the R head; two less holes to deal with if you want to remove the system from your '07 X.
Install '07 R head on '04/'05/'06/'07
250X
So, suppose you wanted to install an '07 R head on an '04/'05/'06/'07 250X; what parts would be needed and about how much would they cost?
Answering this question is not as easy as it seems. Some riders will want all new parts and some will want to re-use anything that's still useable to keep costs down. In the tables below, I've included most parts from the Cylinder Head and Camshaft/Valve pages of the parts catalog. I did not include parts that are included on the head assembly, nor the camshaft and related parts, nor a few others; see the note below the tables. You'll have to decide which parts you want to buy new and which you want to re-use. The parts are listed in '07 250R Parts Catalog order.
NOTE - the new '07 R head part number and price is shown below with associated '07 R parts and prices (except where not available).
|
Service Honda Prices for '07 CRF250R Head and Associated Parts (12/3/06) |
|||||
| Cylinder Head | |||||
| Ref | Description | Part number |
Price, each |
Price, total |
Notes |
| 1 | Cylinder head assembly | 12010-KRN-A00 |
214.70 |
214.70 |
'07 R |
| 4 | Gasket, cylinder head | 12251-KRN-731 |
12.64 |
12.64 |
'05-'07 R, '07 X |
| 8 | Joint, water | 19523-KRN-730 |
8.61 |
8.61 |
'05-'07 R, '07 X |
| 19 | O-ring (19x3) | 91312-KE7-003 |
1.27 |
1.27 |
Same - X/R, all years |
| 20 | Bolt, stud (8x22) - 2 each | 92900-08022-0B |
.69 |
1.38 |
Same - X/R, all years |
|
238.60 |
Sub total | ||||
| Camshaft / Valve | |||||
| Ref | Description | Part number |
Price, each |
Price, total |
Notes |
| 1 | Seal, valve stem - 4 each | 12209-GB4-681 |
3.91 |
15.64 |
Same - X/R, all years |
| 8 | Valve, in - 2 each | 14711-KRN-670 |
39.77 |
79.54 |
Same - X/R, all years |
| 9 | Valve, ex - 2 each | 14721-KRN-670 |
26.59 |
53.18 |
Same - X/R, all years |
| 10 | Lifter, valve - 2 each | 14731-KRN-670 14731-KRN-A00 |
23.06 |
46.12 |
'04-'06 R, '04-'06 X '07 R, '07 X * |
| 11 | Spring, in, valve - 2 each | 14751-KRN-670 14751-KRN-A00 |
3.53 |
7.06 |
'04-'06 R, '04-'07 X '07 R * |
| 12 | Spring, ex, valve - 2 each | 14761-KRN-670 14761-KRN-671 |
4.21 |
8.42 |
'04-'06 R, '04-'07 X '07 R * |
| 13 | Retainer, valve spring - 4 each | 14771-KRN-670 14771-KRN-A00 |
4.55 |
18.20 |
'04-'06 R, '04-'06 X '07 R, '07 X * |
| 14 | Seat, valve spring - 4 each | 14775-KRN-670 |
2.14 |
8.56 |
Same - X/R, all years |
| 15 | Cotter, valve - 8 each | 14781-MAT-000 |
2.15 |
17.20 |
Same - X/R, all years |
|
253.92 |
Sub total | ||||
| Other interesting parts | |||||
| Ref | Description | Part number |
Price, each |
Price, total |
Notes |
| - | Gasket, exhaust pipe | 18291-MM5-860 |
2.79 |
2.79 |
Same - X/R, all years |
| - | Seal, ring (spark plug tube) | 12226-MEB-670 |
1.67 |
1.67 |
Same - X/R, all years |
| - | Gasket, cylinder head | 12251-KRN-671 |
12.53 |
12.53 |
'04-'06 X |
NOTE - The following parts are not shown in the tables; the older parts will work with the '07 R head:
| camshaft, cam bearing cam decompression parts cam thrust washers cam chain tensioner lifter assembly cam chain, guide, and tensioner |
rocker arm, shaft, and cap cylinder head mounting bolts cylinder head cap and o-ring cylinder stud nuts and washers dowel pins |
A note about cylinder head gaskets - '04/'05/'06 X vs '05/'06/'07 R
I did some calculations using the gasket thickness numbers I got when I did my 270 / '05 R head rebuild.
The stock '04 X head gasket measured .4 mm thick. (The '05
and '06 X gaskets are the same part number.)
The '05 R head gasket and the supplied Cometic head gasket each
measured .65 mm thick.
(The '05-'07 R head gaskets are the same.)
Using the Honda Service Manual compression ratio value of 12.9 : 1, I calculated that the thicker gasket ('05 R) lowers the compression ratio to 12.3 : 1.
I used a calculator and did some rounding where normally I use Excel, so the number might be off a teeny bit.
I used the '05 R head gasket when I installed the '05 R head in January '05. If you want a higher compression ratio, use the '04 X head gasket.
Install '08 R head on '04/'05/'06/'07/'08 250X
As shown above for the '07 R head, so also is shown below for the '08 R head and associated parts.
The motivation for using the '08 R head this year is not as strong as for last year's '07 R upgrade. Honda has made no significant change to the ports; the only noticeable change is an extended intake port divider. Honda did change the exhaust valves by reducing the stem diameter from 5mm to 4.5mm. These stainless valves are now lighter but in my opinion, this is not a significant performance improvement in and of itself. The exhaust rocker arm and exhaust rocker arm shaft are lighter. The small valve bits are changed (cotters, retainers).The cam timing is changed. The ignition map is changed. The carb jetting is changed. The piston compression ratio is raised. All of these together, with the lighter exhaust valves, combine to raise the rev limit and boost power a bit.
Whereas using just the new '07 R head last year resulted in better all round performance, the '08 R upgrade using a new head and many other changed parts this year only enhances the top end.
Considering all of the above, if you want to use the '08 R head, you should seriously consider which other '08 R parts you should also include.
In the tables below, I've included most parts from the Cylinder Head and Camshaft/Valve pages of the parts catalog. I did not include parts that are included on the head assembly and a few others; see the note below the tables. For clarity, I have included the '08 R cam information only and not other-years cam information. The combination of parts is too complicated to display clearly. Also, you'll have to decide which parts you want to buy new and which you want to re-use.
|
Service Honda Prices for '08 CRF250R Head and Associated Parts (1/15/08) |
|||||
| Cylinder Head | |||||
| Ref | Description | Part number |
Price, each |
Price, total |
Notes |
| 1 | Cylinder head assembly | 12010-KRN-A10 |
252.16 |
252.16 |
'08 R |
| 4 | Cylinder head gasket | 12251-KRN-731 |
12.64 |
12.64 |
'05-'08 R, '07-'08 X |
| 8 | Water joint | 19523-KRN-730 |
8.61 |
8.61 |
'05-'08 R, '07-'08 X |
| 19 | O-ring (19x3) | 91312-KE7-003 |
1.27 |
1.27 |
Same - X/R, all years |
| 20 | Bolt, stud (8x22) - 2 each | 92900-08022-0B |
.70 |
1.40 |
Same - X/R, all years |
| Camshaft / Valve | |||||
| Ref | Description | Part number |
Price, each |
Price, total |
Notes |
| 1 | Intake valve stem seal - 2 each | 12209-GB4-681 |
3.91 |
7.82 |
Same - X/R, all years |
| 2 | Camshaft | 14100-KRN-A10 |
154.09 |
154.09 |
'08 R |
| 20 | Exhaust valve stem seal - 2 each | 12208-ML0-721 |
5.53 |
11.06 |
'08 R |
| 6 | Exhaust rocker arm | 14440-KRN-A10 |
94.07 |
94.07 |
'08 R |
| 7 | Exhaust rocker arm shaft | 14451-KRN-A10 |
18.66 |
18.66 |
'08 R |
| 8 | Intake Valve - 2 each | 14711-KRN-670 |
40.25 |
80.50 |
Same - X/R, all years |
| 9 | Exhaust valve - 2 each | 14721-KRN-A10 |
30.24 |
60.48 |
'08 R |
| 10 | Valve lifter - 2 each | 14731-KRN-A00 |
25.51 |
51.02 |
'07-'08 R, '07-'08 X |
| 11 | Intake valve spring - 2 each | 14751-KRN-A10 |
4.31 |
8.62 |
'08 R |
| 12 | Exhaust valve spring - 2 each | 14761-KRN-A11 |
4.83 |
9.66 |
'08 R |
| 13 | Intake valve spring retainer - 2 each | 14772-KRN-A10 |
5.24 |
10.48 |
'08 R, '08 X |
| 21 | Exhaust valve spring retainer - 2 each | 14771-KRN-A11 |
4.49 |
8.98 |
'08 R |
| 14 | Valve spring seat - 4 each | 14775-KRN-670 |
2.17 |
8.68 |
Same - X/R, all years |
| 15 | Intake valve cotter - 4 each | 14781-MAT-000 |
2.18 |
8.72 |
Same - X/R, all years |
| 22 | Exhaust valve cotter - 4 each | 14781-ML0-720 |
1.85 |
7.40 |
'08 R |
| Other interesting parts | |||||
| Ref | Description | Part number |
Price, each |
Price, total |
Notes |
| - | Exhaust pipe gasket | 18291-MM5-860 |
2.79 |
2.79 |
Same - X/R, all years |
| - | Seal, ring (spark plug tube) | 12226-MEB-670 |
1.67 |
1.67 |
Same - X/R, all years |
NOTE - The following parts are not shown in the tables; the older parts will work with the '08 R head:
| cam decompression parts cam thrust washers, bearing cam chain tensioner lifter assembly cam chain, guide, and tensioner |
cylinder head mounting bolts cylinder head cap and o-ring cylinder stud nuts and washers dowel pins |
 Cooling Fan Kit - 19000-KSC-000
ALERT 2/21/06
- The '04/'05 fan kit is different than the '06 /'07 kit. The
Honda part descriptions and numbers for the complete fan kits
are:
Fan set, cooling 19000-KSC-000 - '04, '05 about
$200 at Service Honda
Fan set, cooling 19000-KSC-D00 - '06, '07 about
$240 at Service Honda
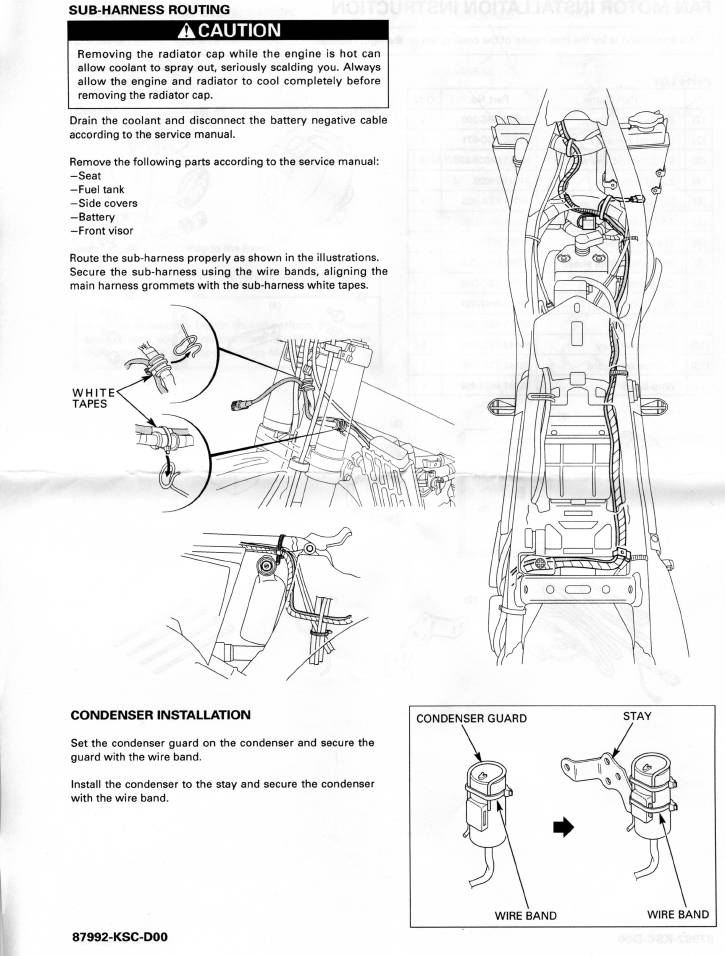
The "D00" kit includes additional parts: condenser,
fan motor relay, sub-harness.
See the Cooling Fan Kit - 19000-KSC-D00
section below for information about the "D00" kit.
ALERT 1/8/08 - The Cooling Fan Kit previously available for the '04 through '07 models is not listed for the '08 model. This does not necessarily mean that a kit cannot be fitted to the '08 model. The right radiator, which has the fan mounting tabs and thermostat tap, is unchanged from previous years. The '06/'07 kit had extra components that allowed it to be fitted on '06/'07 models even after some electronic components were changed or deleted starting with the '06 model. The '06/'07 kit should work on the '08 model, but you may have to run extra wires to the battery hot/ground (the wire harness is changed on the '08 model, wiring to the battery and a connector were probably removed.).
11/1/04 - I waited all summer for Service Honda to call me and tell me the Cooling Fan Kit was finally here, but they never called. I was hoping to get the cooling fan kit so I could install it when I installed the big-bore kit - for insurance against overheating.
I contacted a few riders in England to see if they could help, but after checking around, they said that the kit was nowhere to be found.
Finally, after a long evening of googling, I located a reputable Honda dealer in Rugby, England. Yes, that rugby - where the game was invented. The dealer's name is Nightingales of Rugby.
Using their web site,
I sent them an inquiry asking about the kit, and the very next
day I got a price quote via e-mail! I called them to make sure
we were talking about the cooling fan kit for the CRF250X, part
number 19000-KSC-000, and yes, they confirmed that they could
get me one. So, I sent them an e-note ordering the kit and included
my mailing info. I followed up with another call to tell them
my VISA number. One week later, I got this in an e-note "On
its way to you. Total price with post £146.27. Should take
3-7 days." and about fell out of my chair. I don't get service
this good from many companies in the US. Six days later, the postlady
rang my doorbell and handed me a package shipped via "Royal
Mail" - it was the cooling fan kit. I tore open the small
box to find an even smaller box inside: an official Honda parts
box. Inside was the kit. I weighed the entire kit on my super
accurate scale - 14 oz. Wow.
So, quick as a wink, I set to work and installed the cooling fan on my 250X according to the instruction sheet included with the kit.
 You have to remove the seat,
radiator shrouds, and tank to get to the innermost mounting tab
and the wiring. There is an existing plug taped to the wiring
harness. Remove the tape and reposition the plug. You must remove
the protective end-cover before plugging in the fan.
You have to remove the seat,
radiator shrouds, and tank to get to the innermost mounting tab
and the wiring. There is an existing plug taped to the wiring
harness. Remove the tape and reposition the plug. You must remove
the protective end-cover before plugging in the fan.
I was able to get the radiator plug out and the thermostat in without loosing too much Engine Ice. It helps to leave the radiator cap on to hold the liquid in the radiator somewhat. The thermostat takes a 22mm wrench. The fan and shroud went on without a hitch.
I reinstalled the tank, shrouds, and seat. I topped up the
radiator, turned on the gas, pulled the choke, and started the
motor. It runs! The motor, not the fan. We had snow here overnight,
and it was a bit chilly out this afternoon, so I had to be creative
to get this engine to overheat. I parked my bike in the garage
door with the exhaust outside and the engine and radiators inside.
Inside the heated garage. After a few minutes, the temperature
on the Racetemp strip started climbing. At about 204 degrees F,
the cooling fan came on. The temperature immediately started back
down. Soon the fan went off. Success! It was neat to see the fan
whip on; it spins pretty fast.
The fan fits fine with the Flatland radiator guard. I had no problems installing the kit; it took about 30 minutes.
All summer, I have never had my 250X overheat to the point of the radiators bubbling into the overflow tank. I usually keep an eye on the Racetemp strip, and I've never seen it over 190 degrees F. So, you might question the wisdom of installing a cooling fan. Well, I don't know how much more heat the 270 kit will produce, but I think the fan will handle the heat. And, I like the idea that the fan will kick in whenever I get pokey on the trails.
See also: more info on
cooling.
Nightingales, the UK Honda dealer that I dealt with, said that they would be willing to sell additional kits to other US riders. At £146 (about US $272, depending on the exchange rate), the kit is not cheap. This price includes VAT and shipping. I talked to John in the parts department, and he was very good. Thank goodness I've been watching mystery movies on BBC America - his accent wasn't insurmountable. There is a time difference to keep in mind if you call them.
|
E-mail address: Parts Department |
Phone 01788 535828 / 573257 When I called, I used the following: 011 44 1788 535 828 |
I can't believe how easy it was to deal with John at Nightingales and how quickly the kit arrived. I am very satisfied. PS I paid full retail.
4/4/07 - I switched from Flatland radiator guards to modified Moose guards and had to relocate the cooling fan/shroud. I added two washers (one lock, one flat) to space the fan/shroud away from the Moose rear brace. I also switched to slightly longer mounting bolts on the fan shroud. Everything fits fine, and I'll test it out on a tight trail when we get some warm weather.
 |
 |
 |
Cooling Fan Kit - 19000-KSC-D00
 4/4/07
- This cooling fan kit ("D00") is used on the '06 and
'07 CRF250X models.
4/4/07
- This cooling fan kit ("D00") is used on the '06 and
'07 CRF250X models.
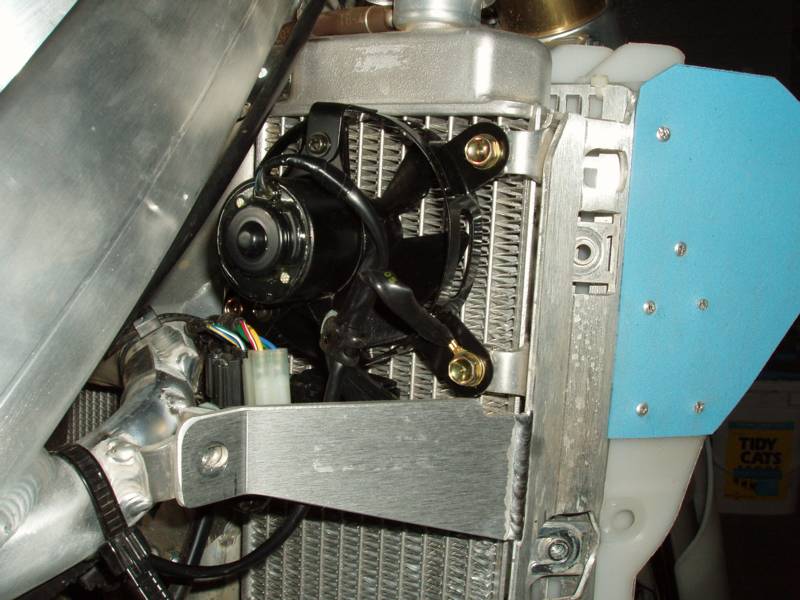
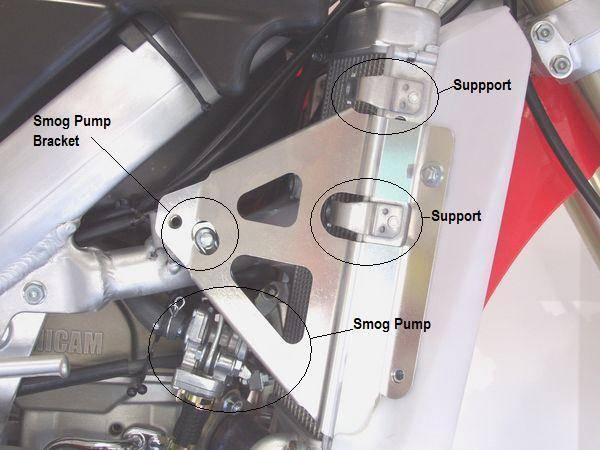
There was a discussion on the CRF450X forum on ThumperTalk about whether a cooling fan kit was available for the 450X, like the kit for the 250X. One rider posted a picture showing the fan shroud mounting brackets on the '06 CRF450X right-side radiator (labeled "Support"). -->
Seeing the brackets was all the motivation I needed to study this possibility further.
I studied the '05 450X wiring diagram and saw that it was very similar to the '06/'07 250X diagrams, notably where the fan connects (the taillight circuit). Based on the wiring similarities and the brackets on the radiator, it looks to me like the "D00" kit would mount on the '05 450X, at least, and probably on the '06 and '07 also. So I ordered the "D00" kit from Service Honda for about $240 to see what was in the kit.
When I got the "D00" kit, I inspected it to see how it differed from the original "000" kit (see previous section).The "D00" kit does indeed have extra parts included that allow it to be mounted on '06 and '07 250X bikes: condenser, condenser stay, condenser guard, fan motor relay, sub-harness, and some zip-ties. A previous report noted that a rectifier was also included, but I did not find a rectifier in the kit. It may be integrated with the condenser, but I'm not going to take the condensor cover apart to see. The cooling fan, shroud, and other parts look just like the parts in the "000" kit. As far as I can tell, there is nothing in the kit that would prevent using it on a 450X. All we need now is a guinea pig, err, willing tester. If someone will step forward and mount one of these kits on a 450X and provide some pictures we can all gawk at, I'll put the information and pictures right here.
2/6/08 - Someone has done just that; see Ken-ichi's report next.
Installation Instructions (click to supersize)
|
|
|
|
|
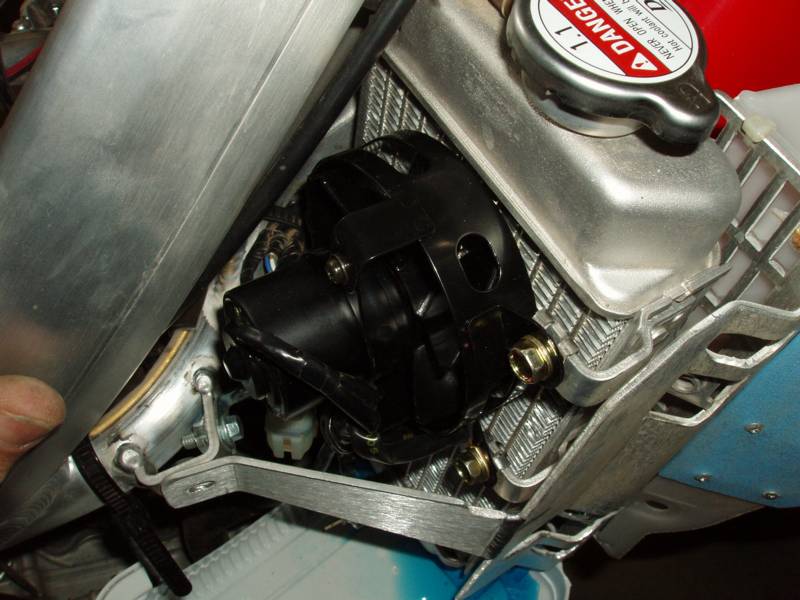
2/6/08 - Cooling fan kit installation on the CRF450X.
Ken-ichi Iwasaki, an amateur biker living in Japan, has sent me a report on installing a CRF250X cooling fan kit on a CRF450X. With his kind permission, I am including his report and pictures here.
---------------------------
I got a '07 CRF450X this spring and immediately found it was difficult to obtain rigorous information about the cooling fan for it. Indeed there exists a CRF250X aftermarket, but nobody seems to have concrete knowledge for the cooling fan for the CRF450X. I finally found your web site that seems to have a relation to it.

I bought the cooling fan kit (19000-KSC-D00) from a shop in Suzuka, a home field of Honda, where 30 sets were in store. I assembled the kit according to the manual, just connecting the power line to the line for the tail lamp. I only had to extend the line from the thermostat, which is short for the CRF450X.
I confirmed the fan works well under low-speed and high-load running and temperature over 35 degrees Celsius.

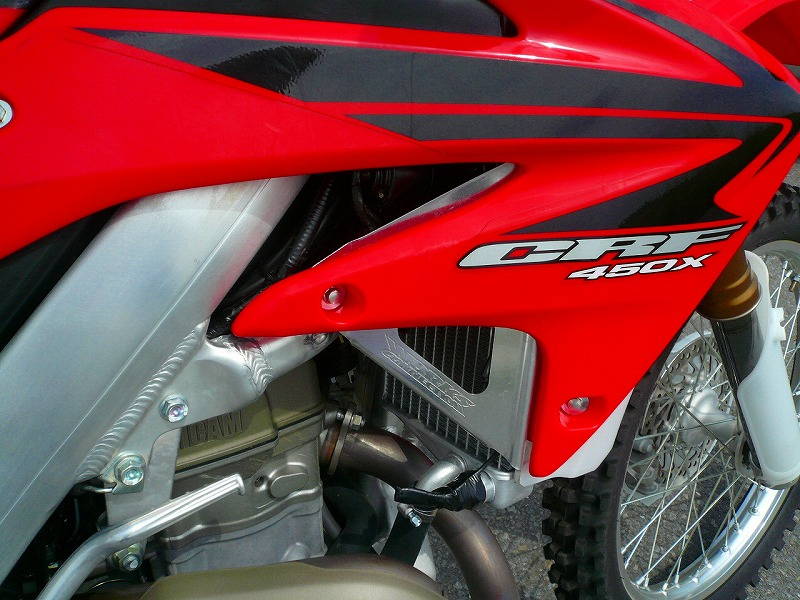
I mounted Works Connection radiator guards. However I had to cut out a piece on the right guard to avoid the cooling fan guard.

I also mounted a CRF450R skid plate (there is no favorite one for the 450X). Before mounting it, I fabricated a bracket, because the front side mount touches the CRF450X reserve tank. I used two L-angled brackets to fix it.
Ken-ichi, thank you for the report. CRF450X owners will be happy to read this valuable information.
Introduction
MyModifications
BigBore/TopEnd Maintenance
Jetting
Gearing
Comparo
Pictures
Home